
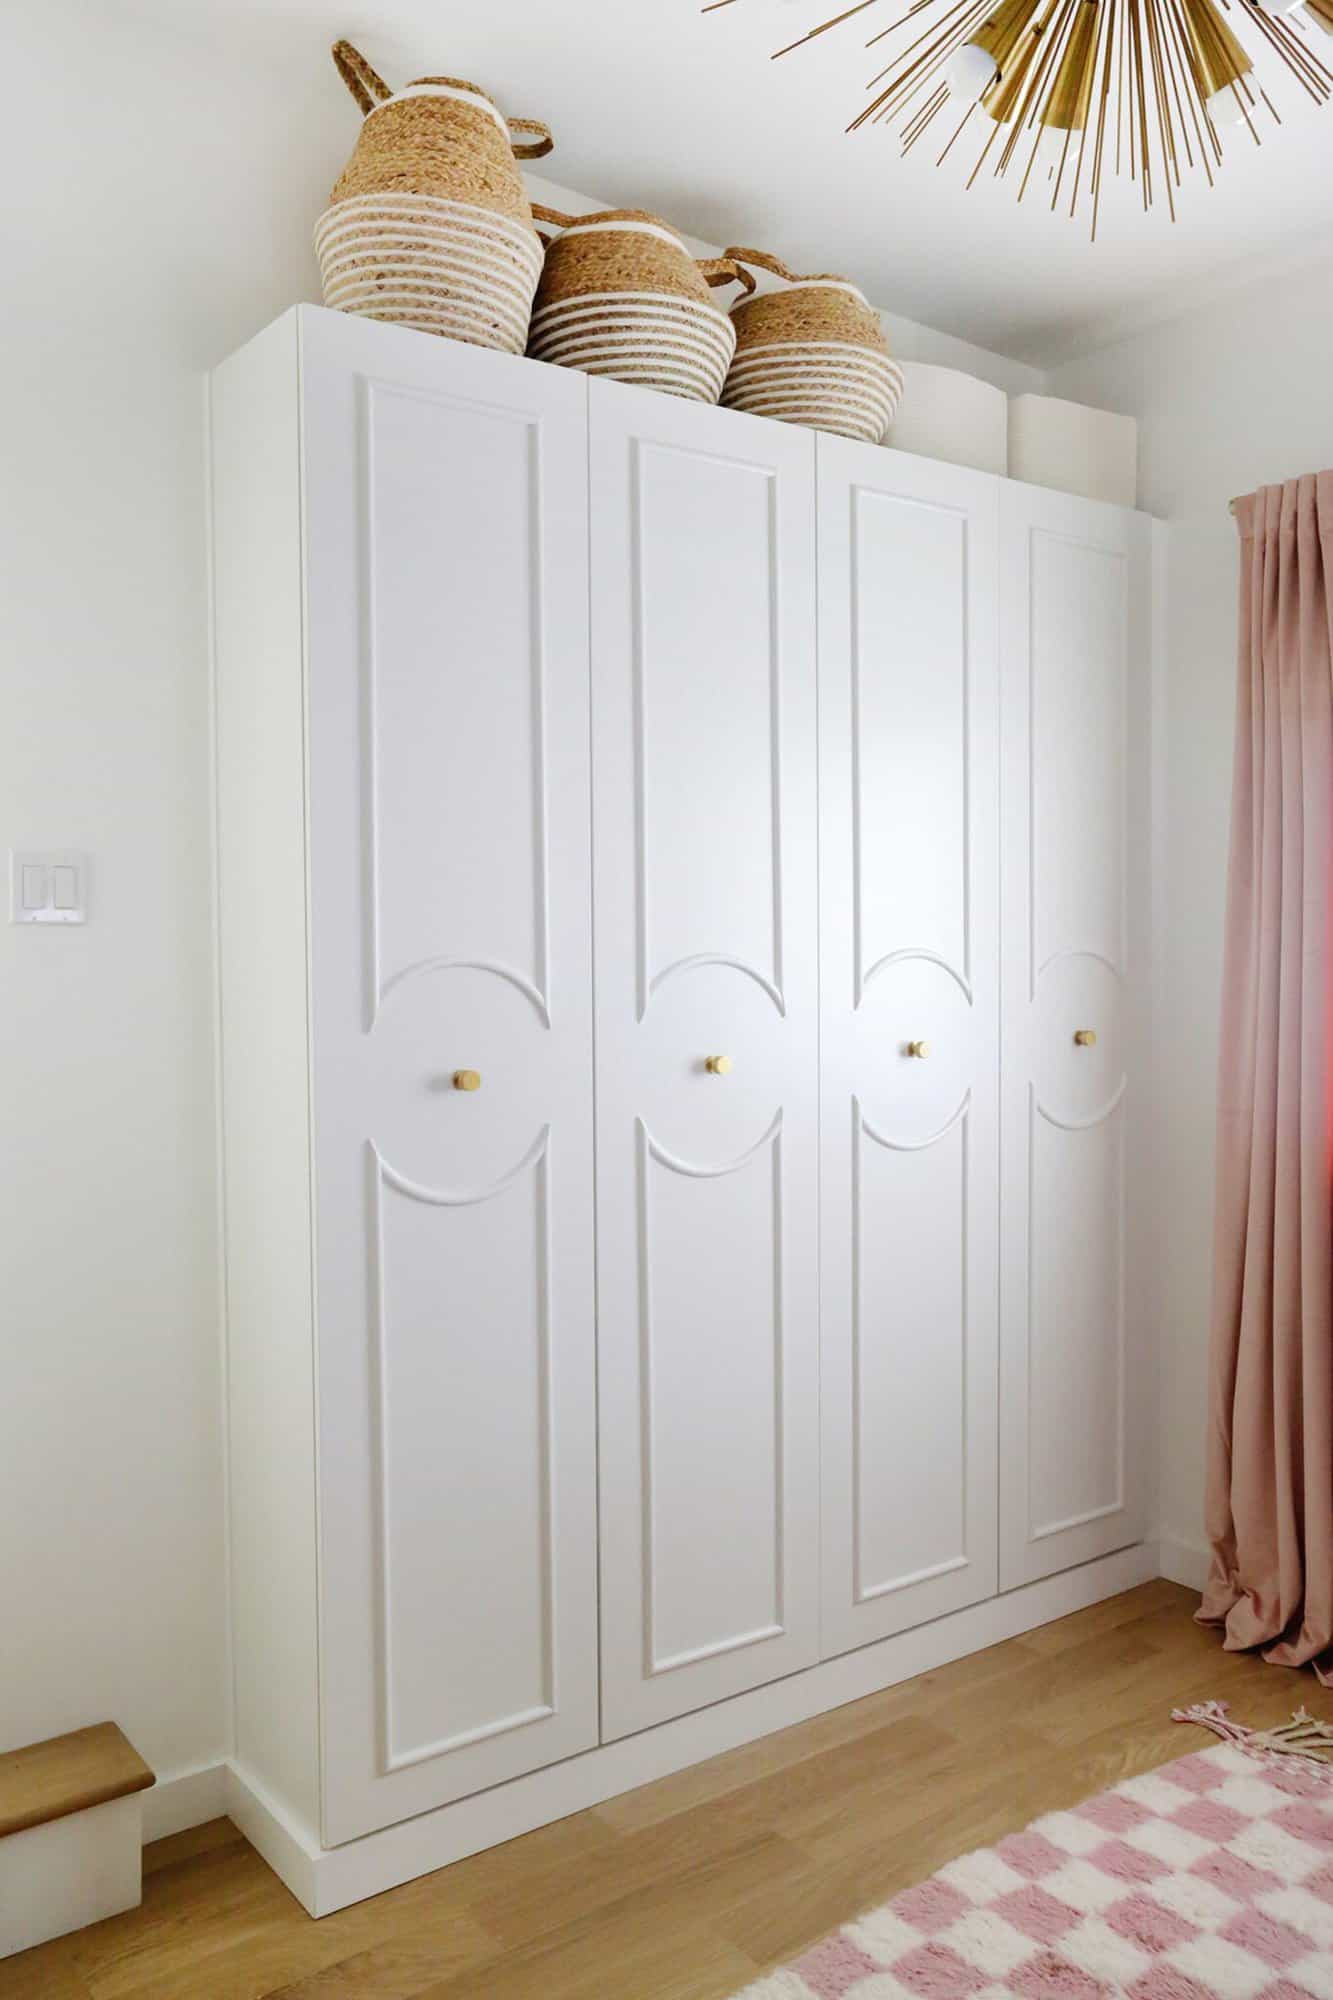
I love a good IKEA hack. When I needed a closet/wardrobe in a room in our home that had no closet (it used to be a porch that they converted into a room), I thought about trying to custom build some shelving.
But, then I remembered that ordering an inexpensive Pax wardrobe and building it into the wall would be the fastest, easiest, and best looking solution to my closet storage problem.
If you’re asking, “How do you make IKEA Pax wardrobes look built in?” it’s actually pretty simple and I was surprised how fast the process went. I’ll show you what I did!
Looking to organize your closet space? Check out these posts:
- How To Customize A Store-Bought Closet System
- How To Organize a Closet in a Non-Permanent Way (No Drilling and Perfect For Renters!)
- Divided Built-In Closet DIY
- Elsie’s Low Waste Closet Renovation
- Easy Built-In Closet DIY
Supplies:
–IKEA Pax wardrobes (I did this double set and added plain doors)
–2 1/2″ or 3″ construction screws
-drill
–miter saw or hand saw with a miter box
-2x4s or 2x2s for base
–finishing nail gun or small finish nails, a hammer, and a nail setter
-baseboard to match your current baseboard
–wood filler and caulk
-paint in your current baseboard color and/or IKEA Pax Wardrobe color
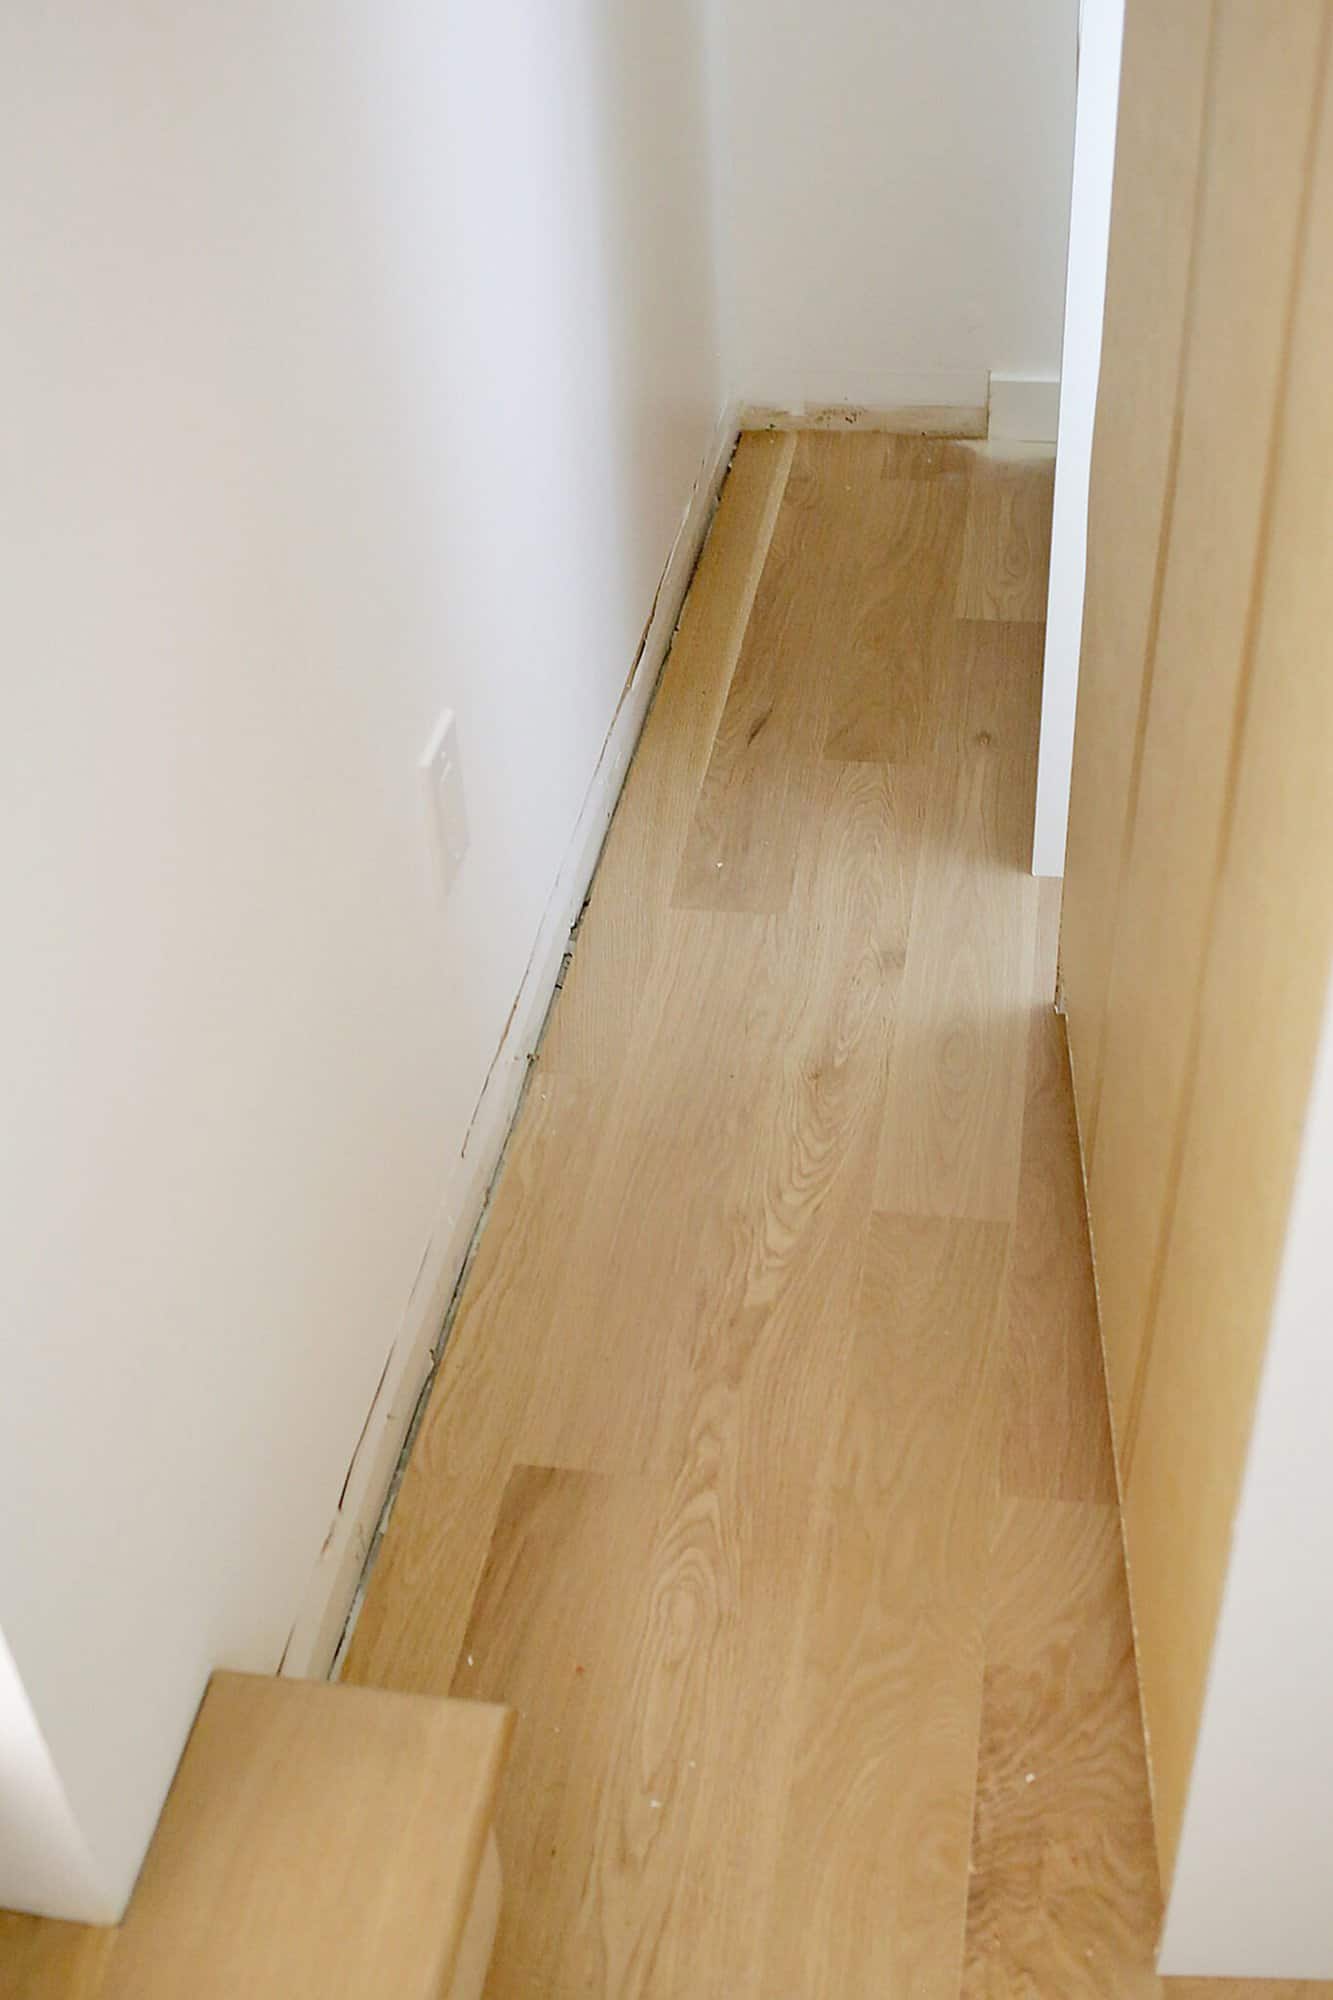
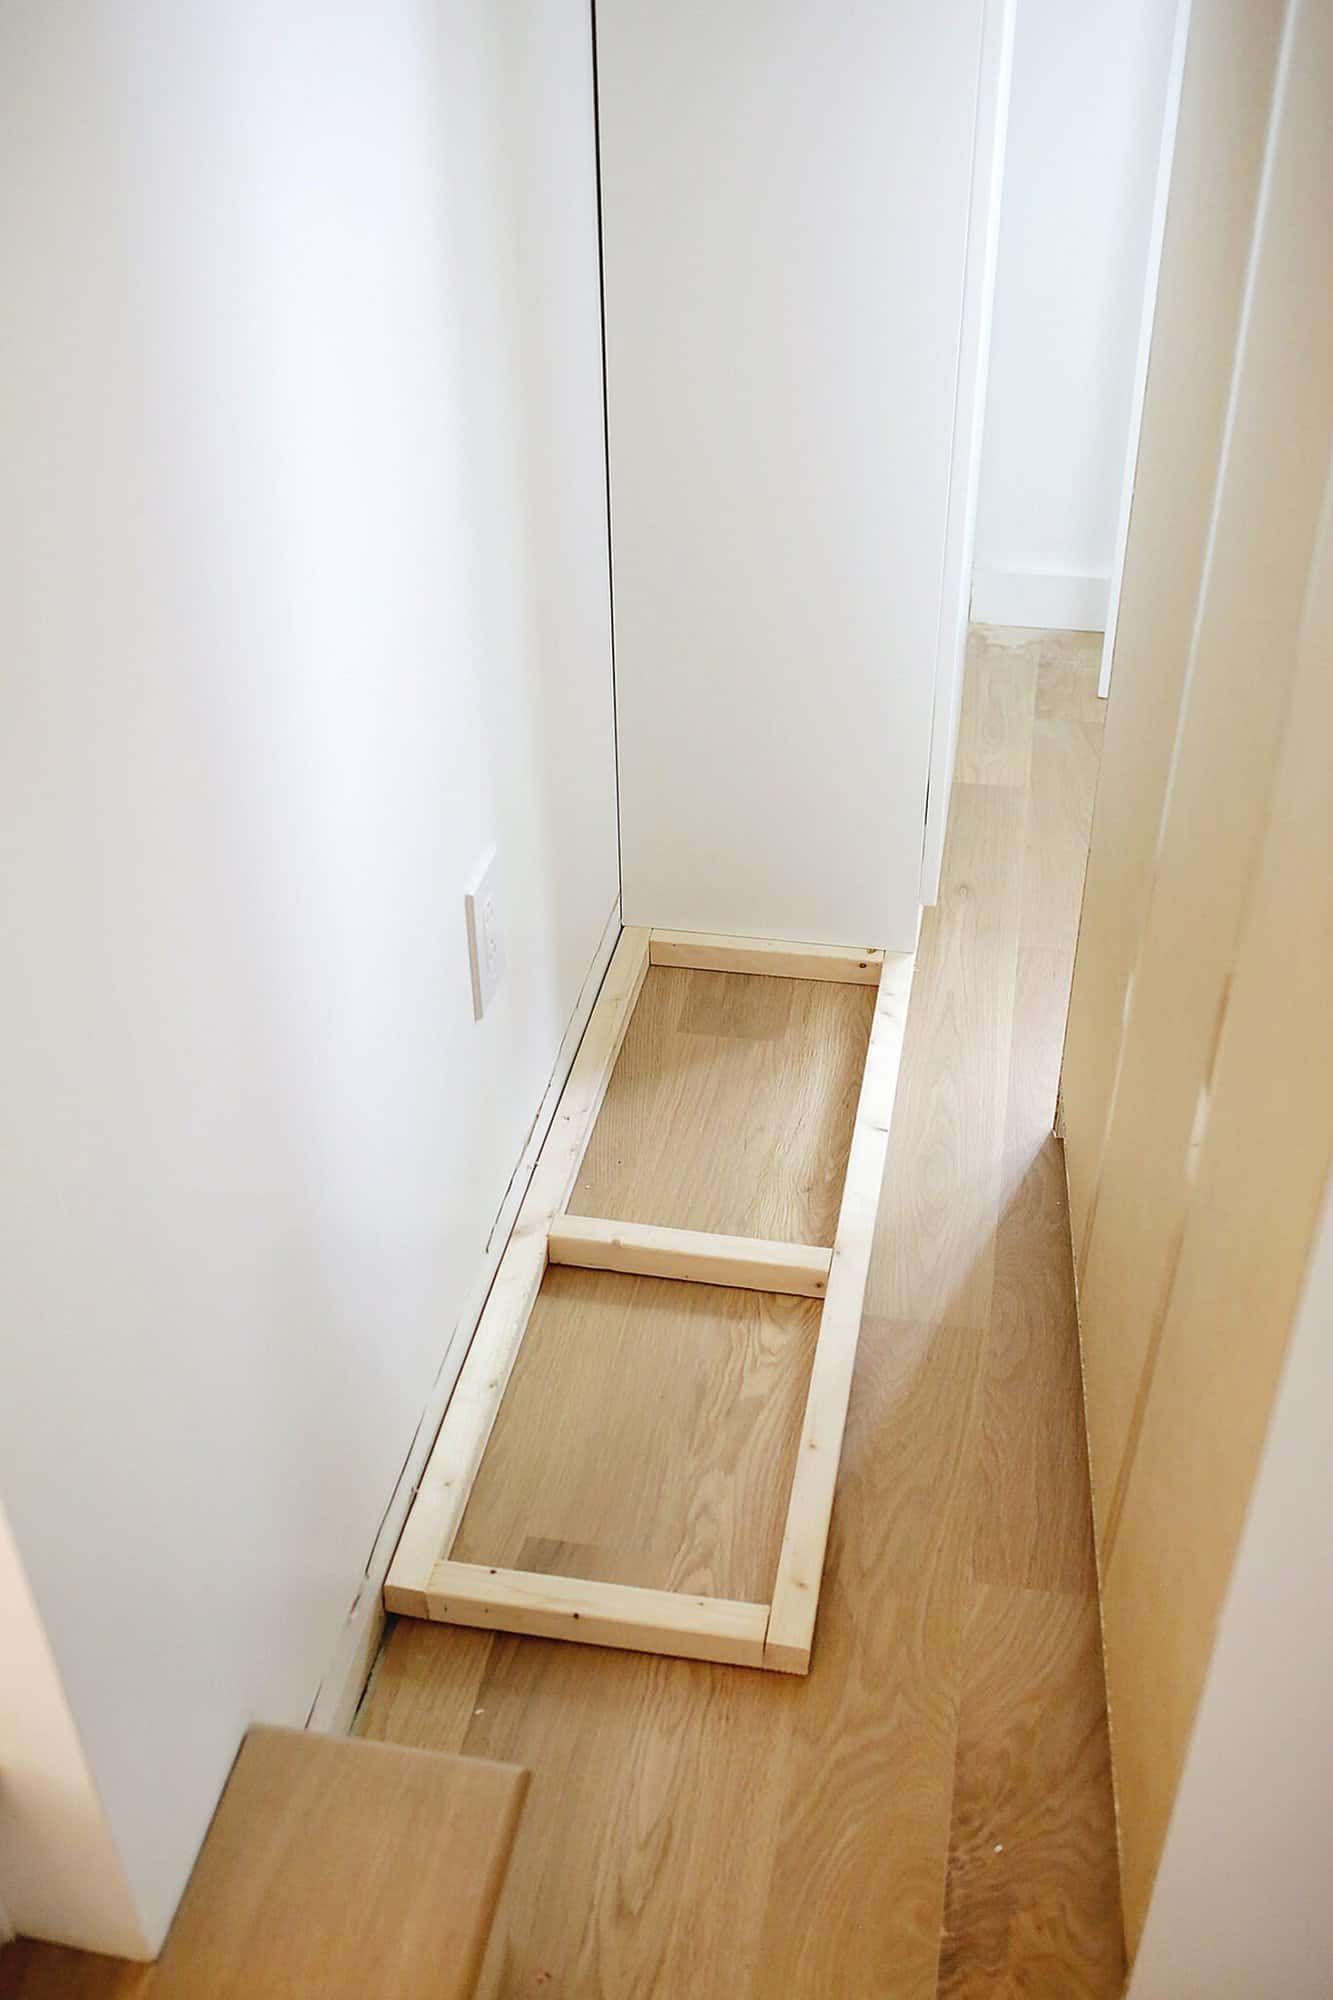
Step one: Remove the baseboard. You’ll want to first remove the baseboard on the wall that you are placing your shelving so that it can sit totally flush against the wall. Just use a box cutter/razor to cut the bead of caulk between the top of the baseboard and the wall to disconnect that connection point.
Then, use a crowbar to gently pry the baseboard off the wall (pull it a little bit every foot or so to try and keep it all coming off at about the same pace to avoid breaking it).
If you want to only remove the amount needed rather than the whole baseboard, you can use a multi-tool like this and mark how much board you want removed based on your closet width and length measurements.
Then cut a line down the board so you can simply pull off the piece you want removed (you can see I did that on the back right corner of my photo).
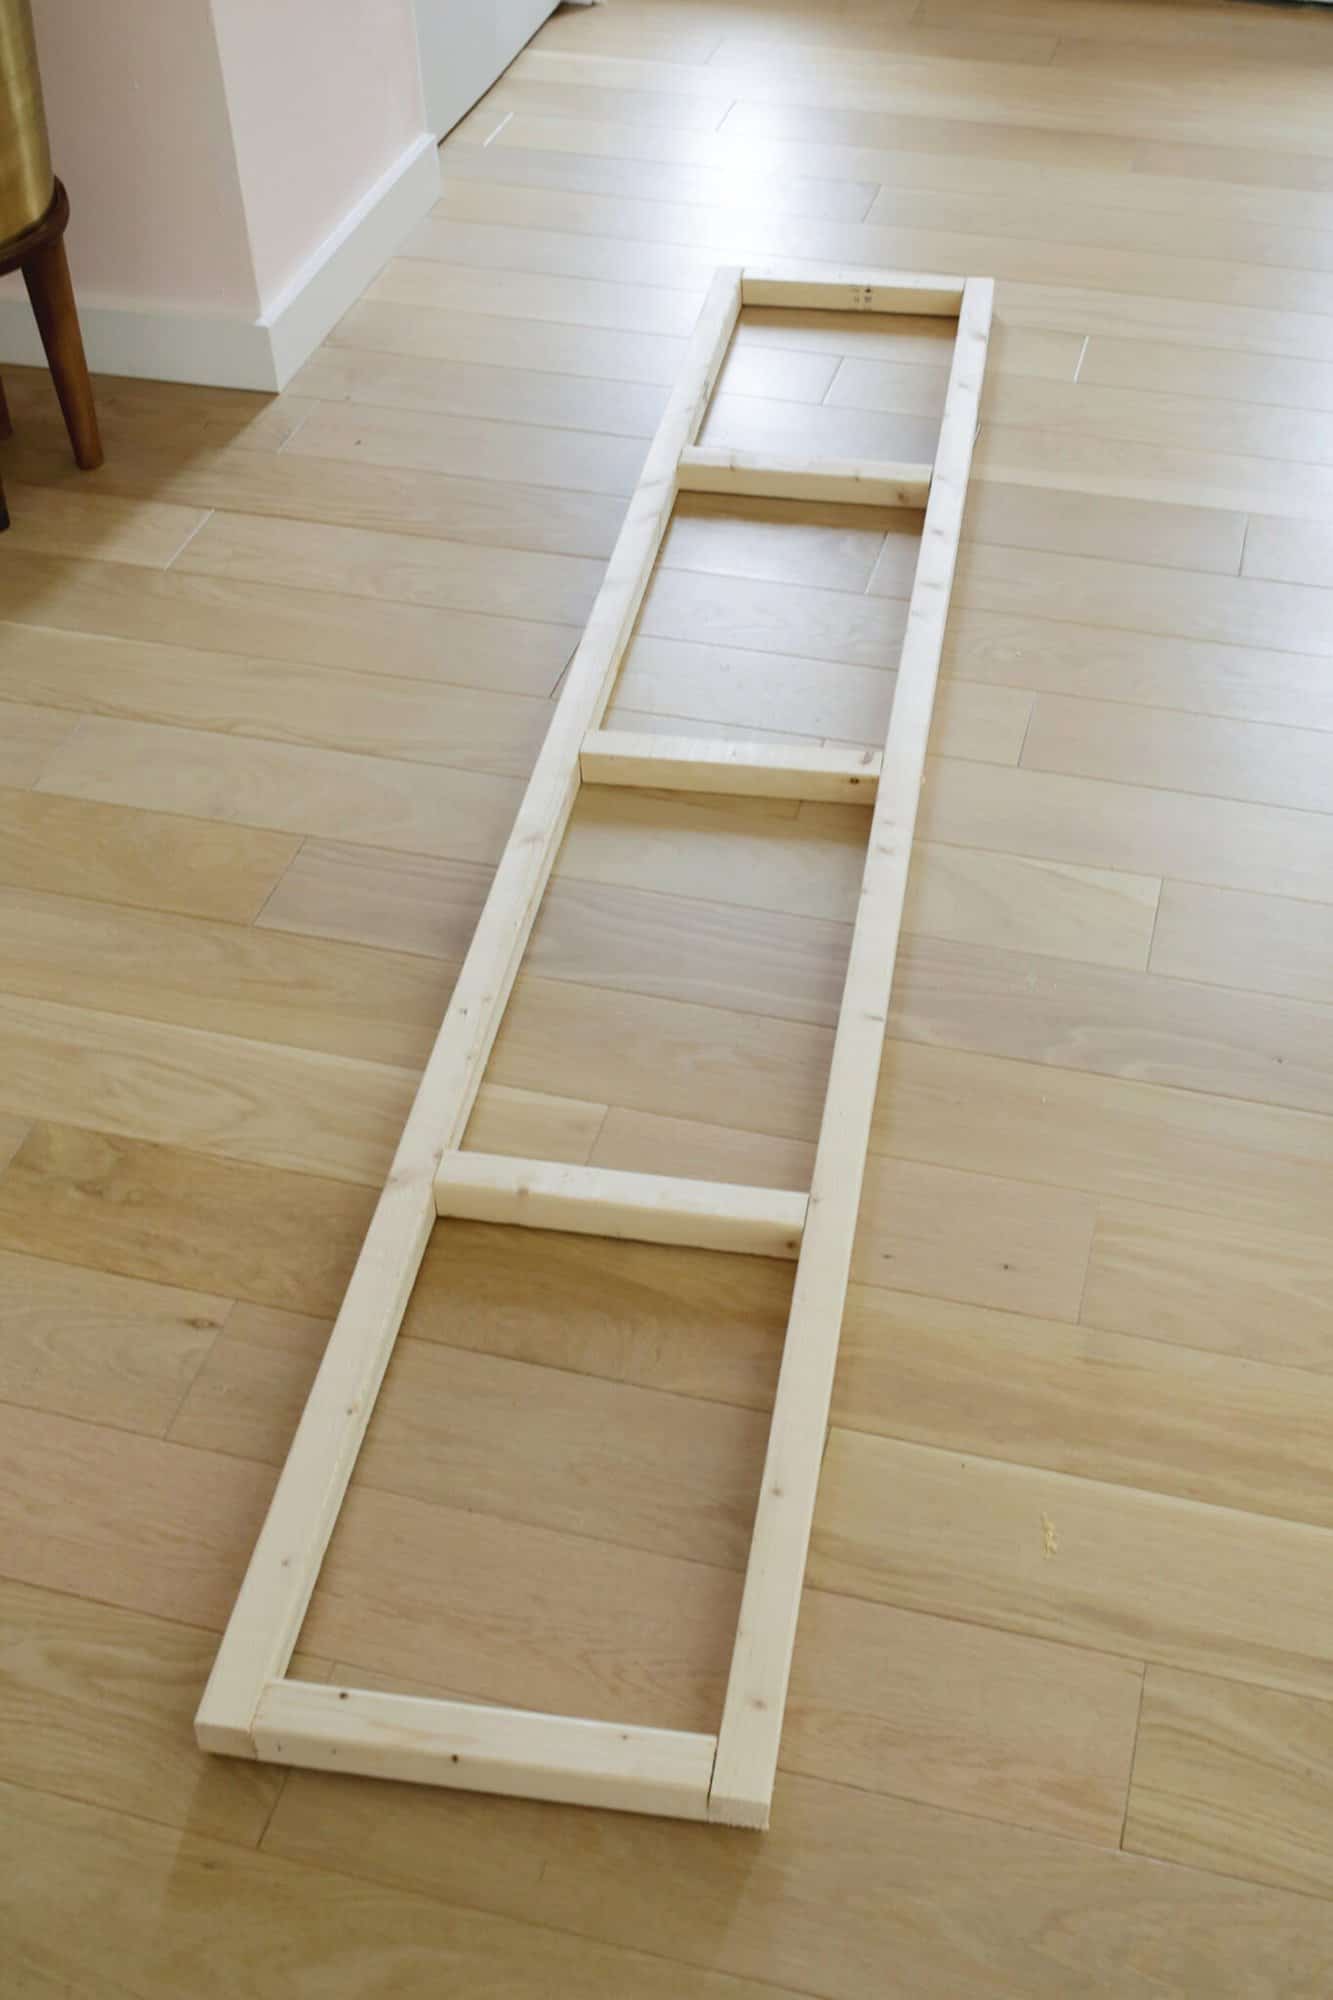
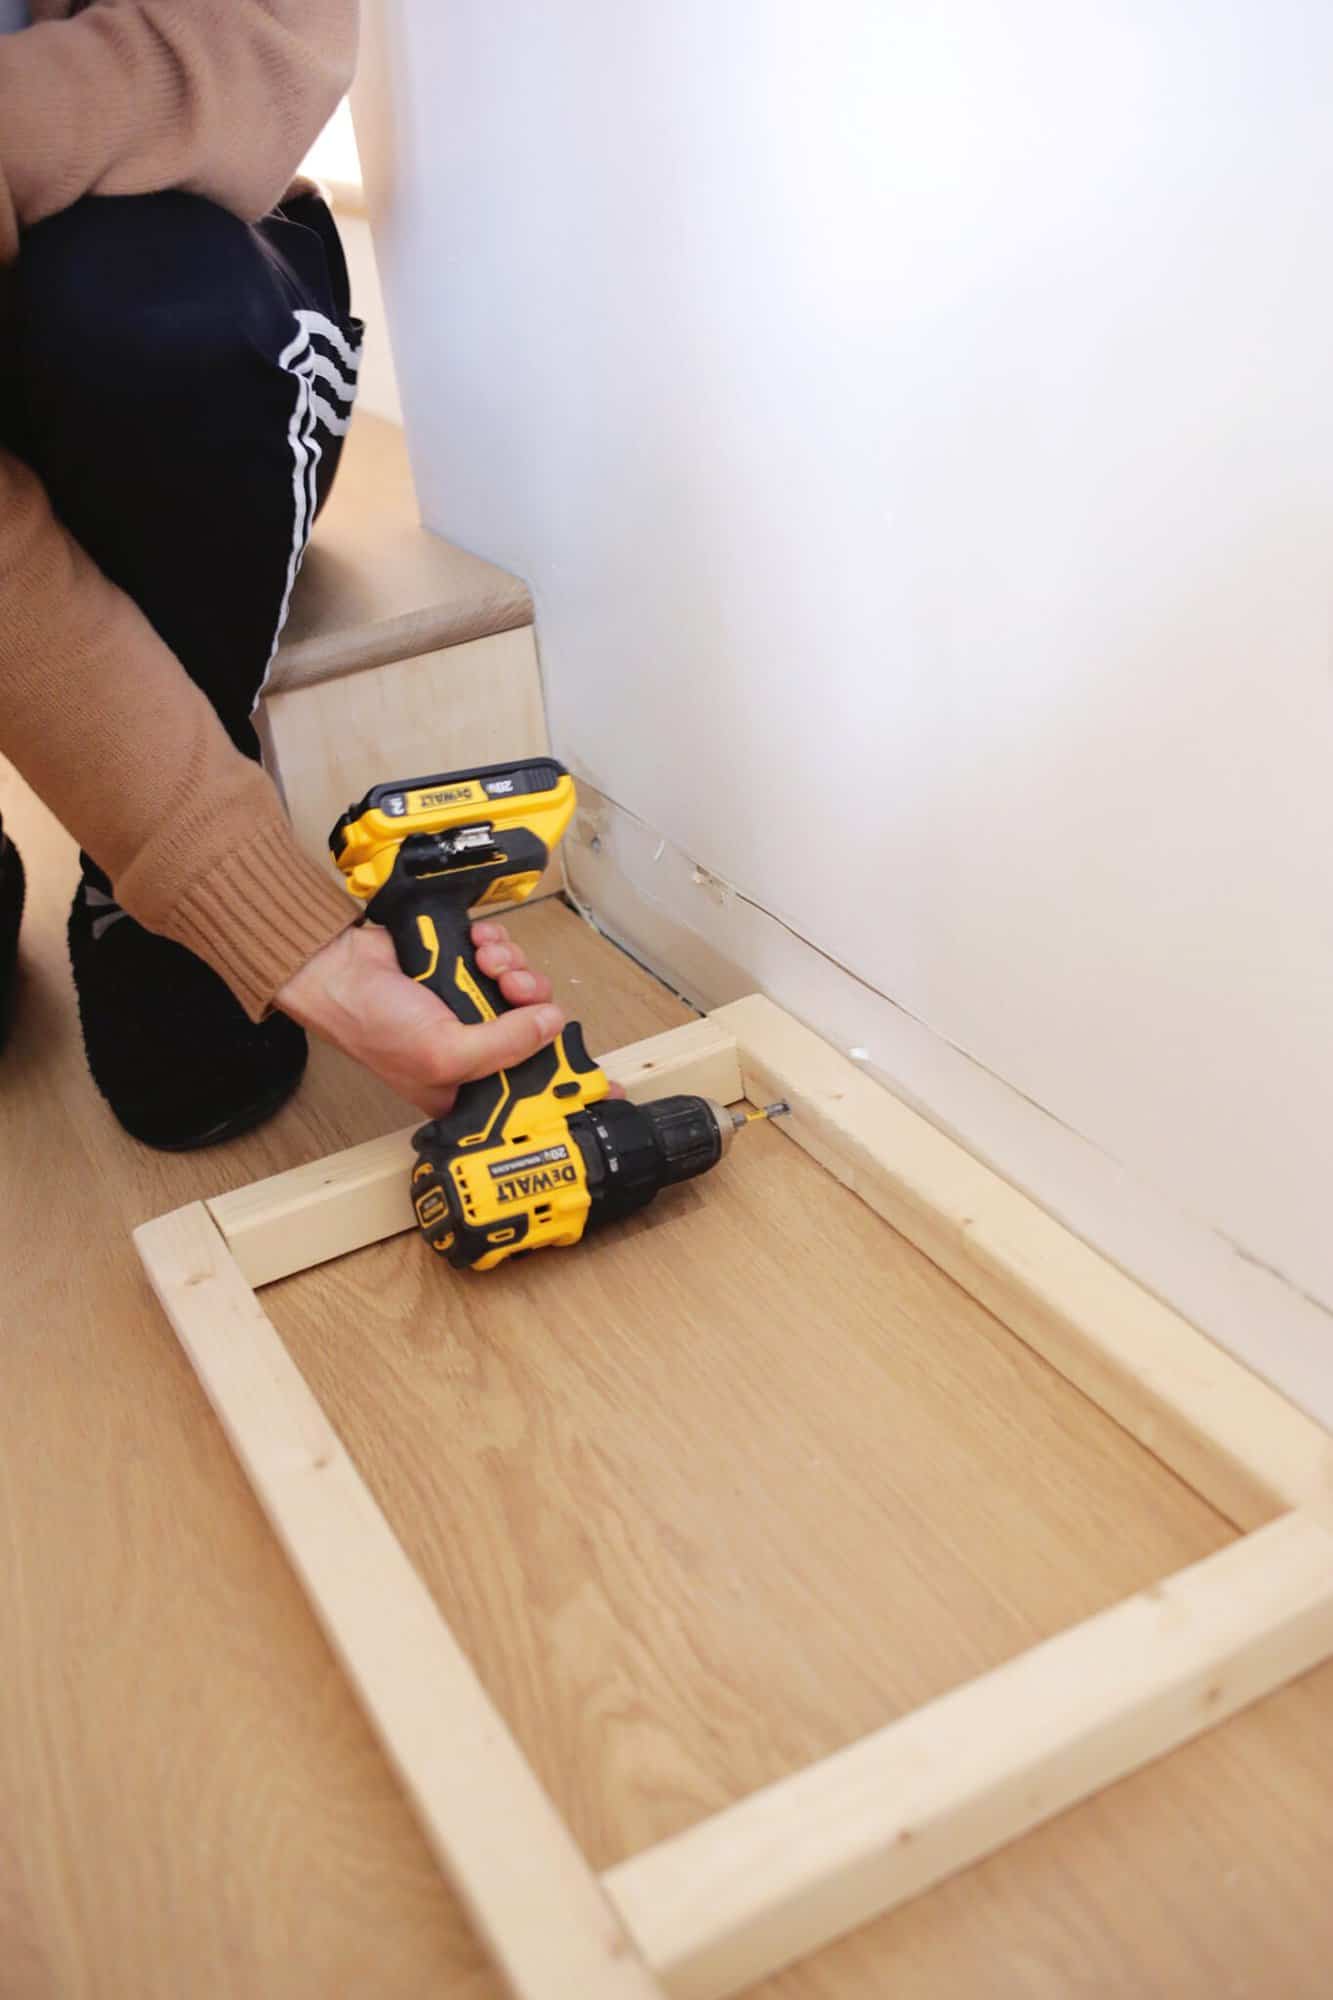
Step two: Build your simple rectangle platform. You know what a rectangle looks like? Good. All you have to do now is build a base with either 2x4s or 2x2s that is the same size as your cabinet dimensions.
So let’s say for simplicity’s sake your total closet measures 24″ wide and 80″ long, you would build a base 24″ wide and 80″ long so it fits perfectly under your closet.
I used a miter saw for this, but you can also use a hand saw with a miter box to cut your boards to the right lengths.
You’ll see I also cut some middle support boards that are the same length as my end pieces so the middle of the closet had something to rest on as well. Just screw your boards in place from the outside edges and your platform is ready to go.
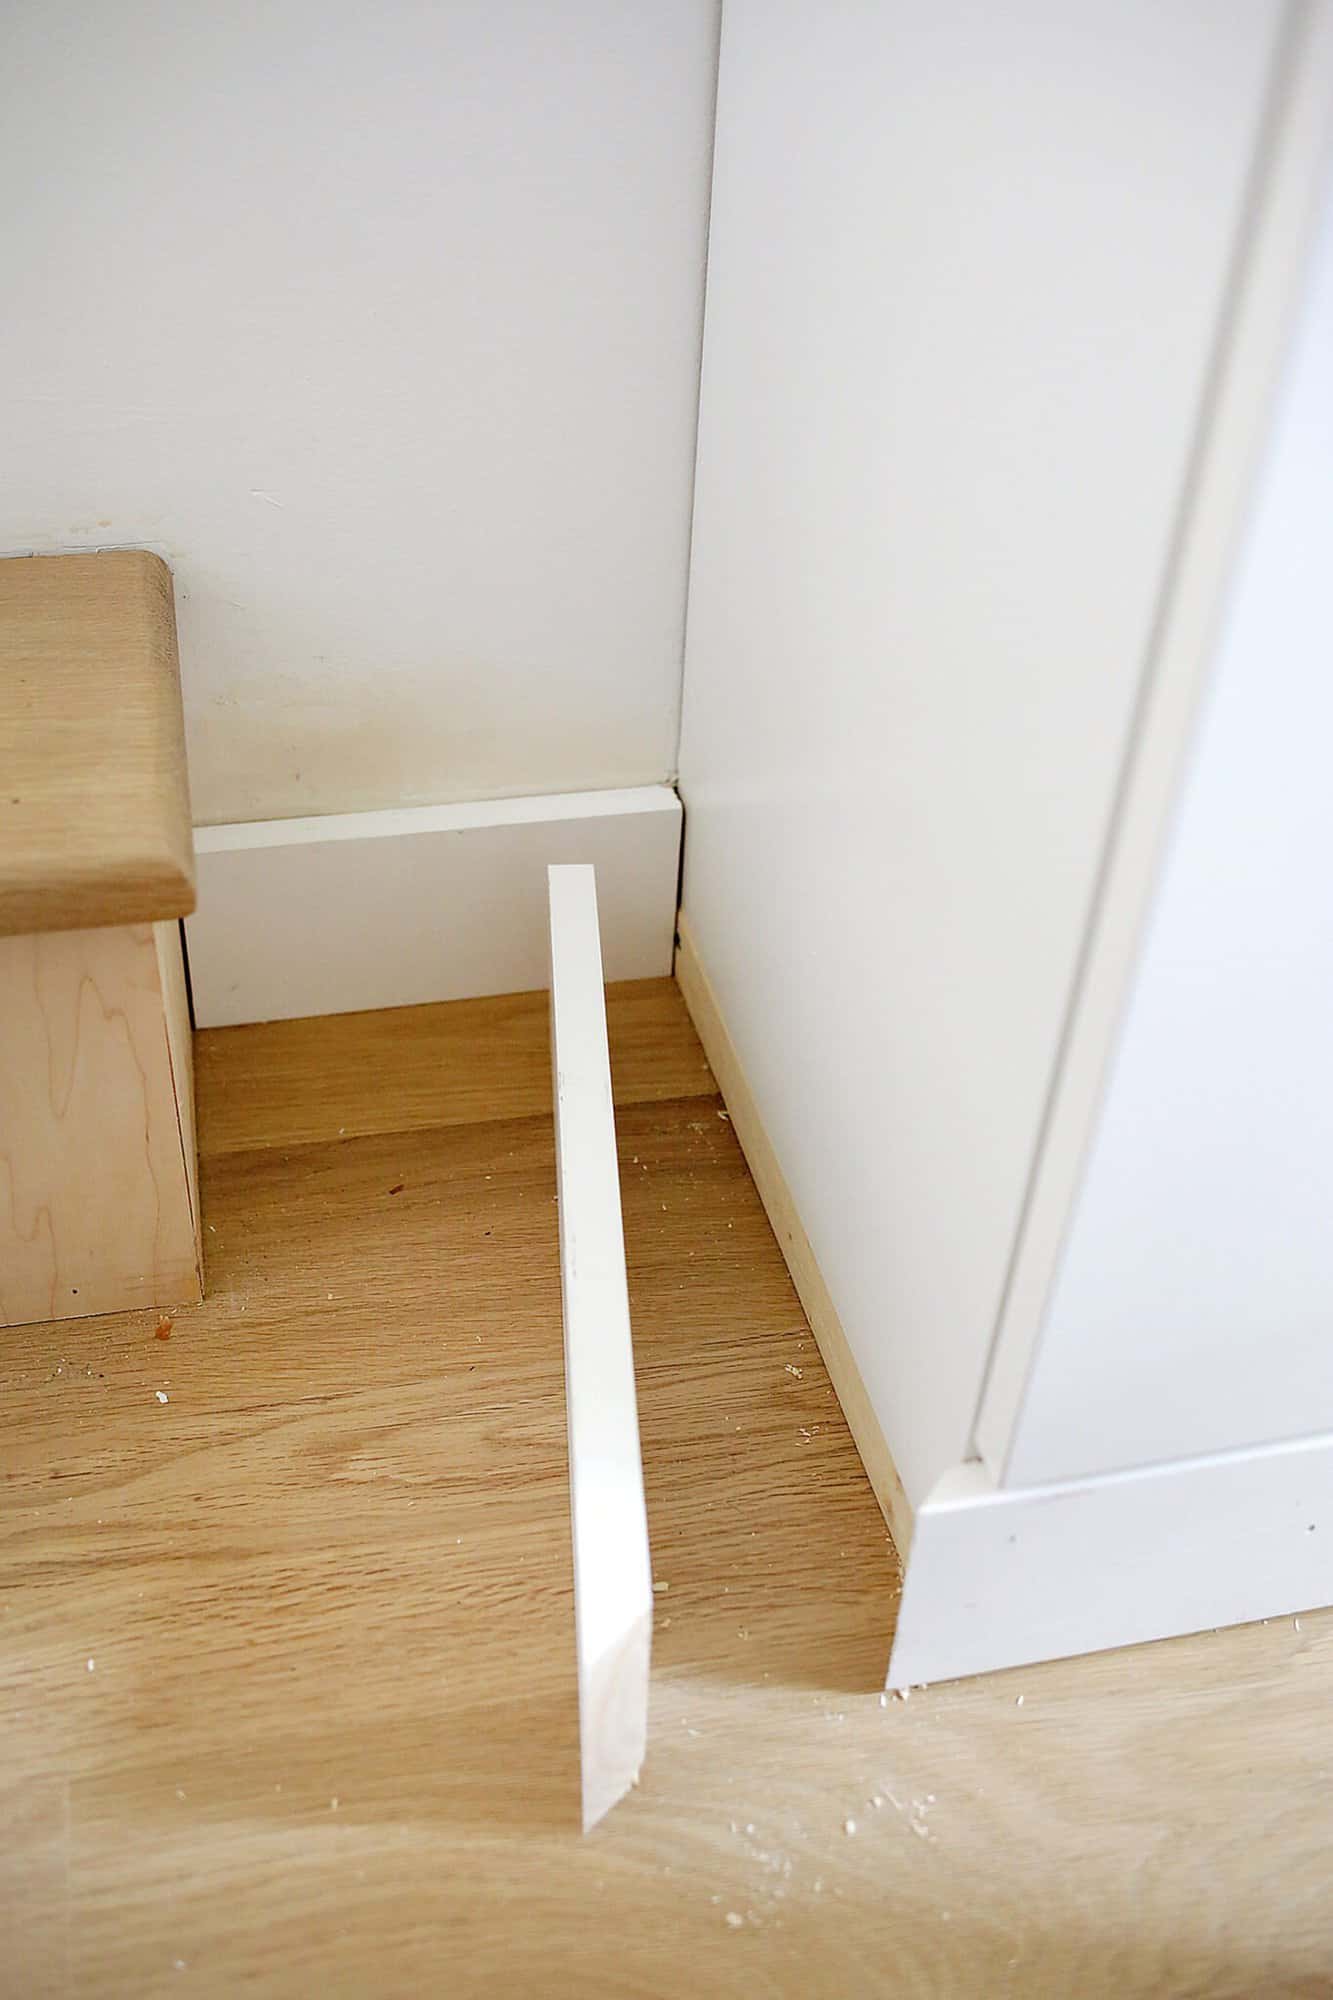
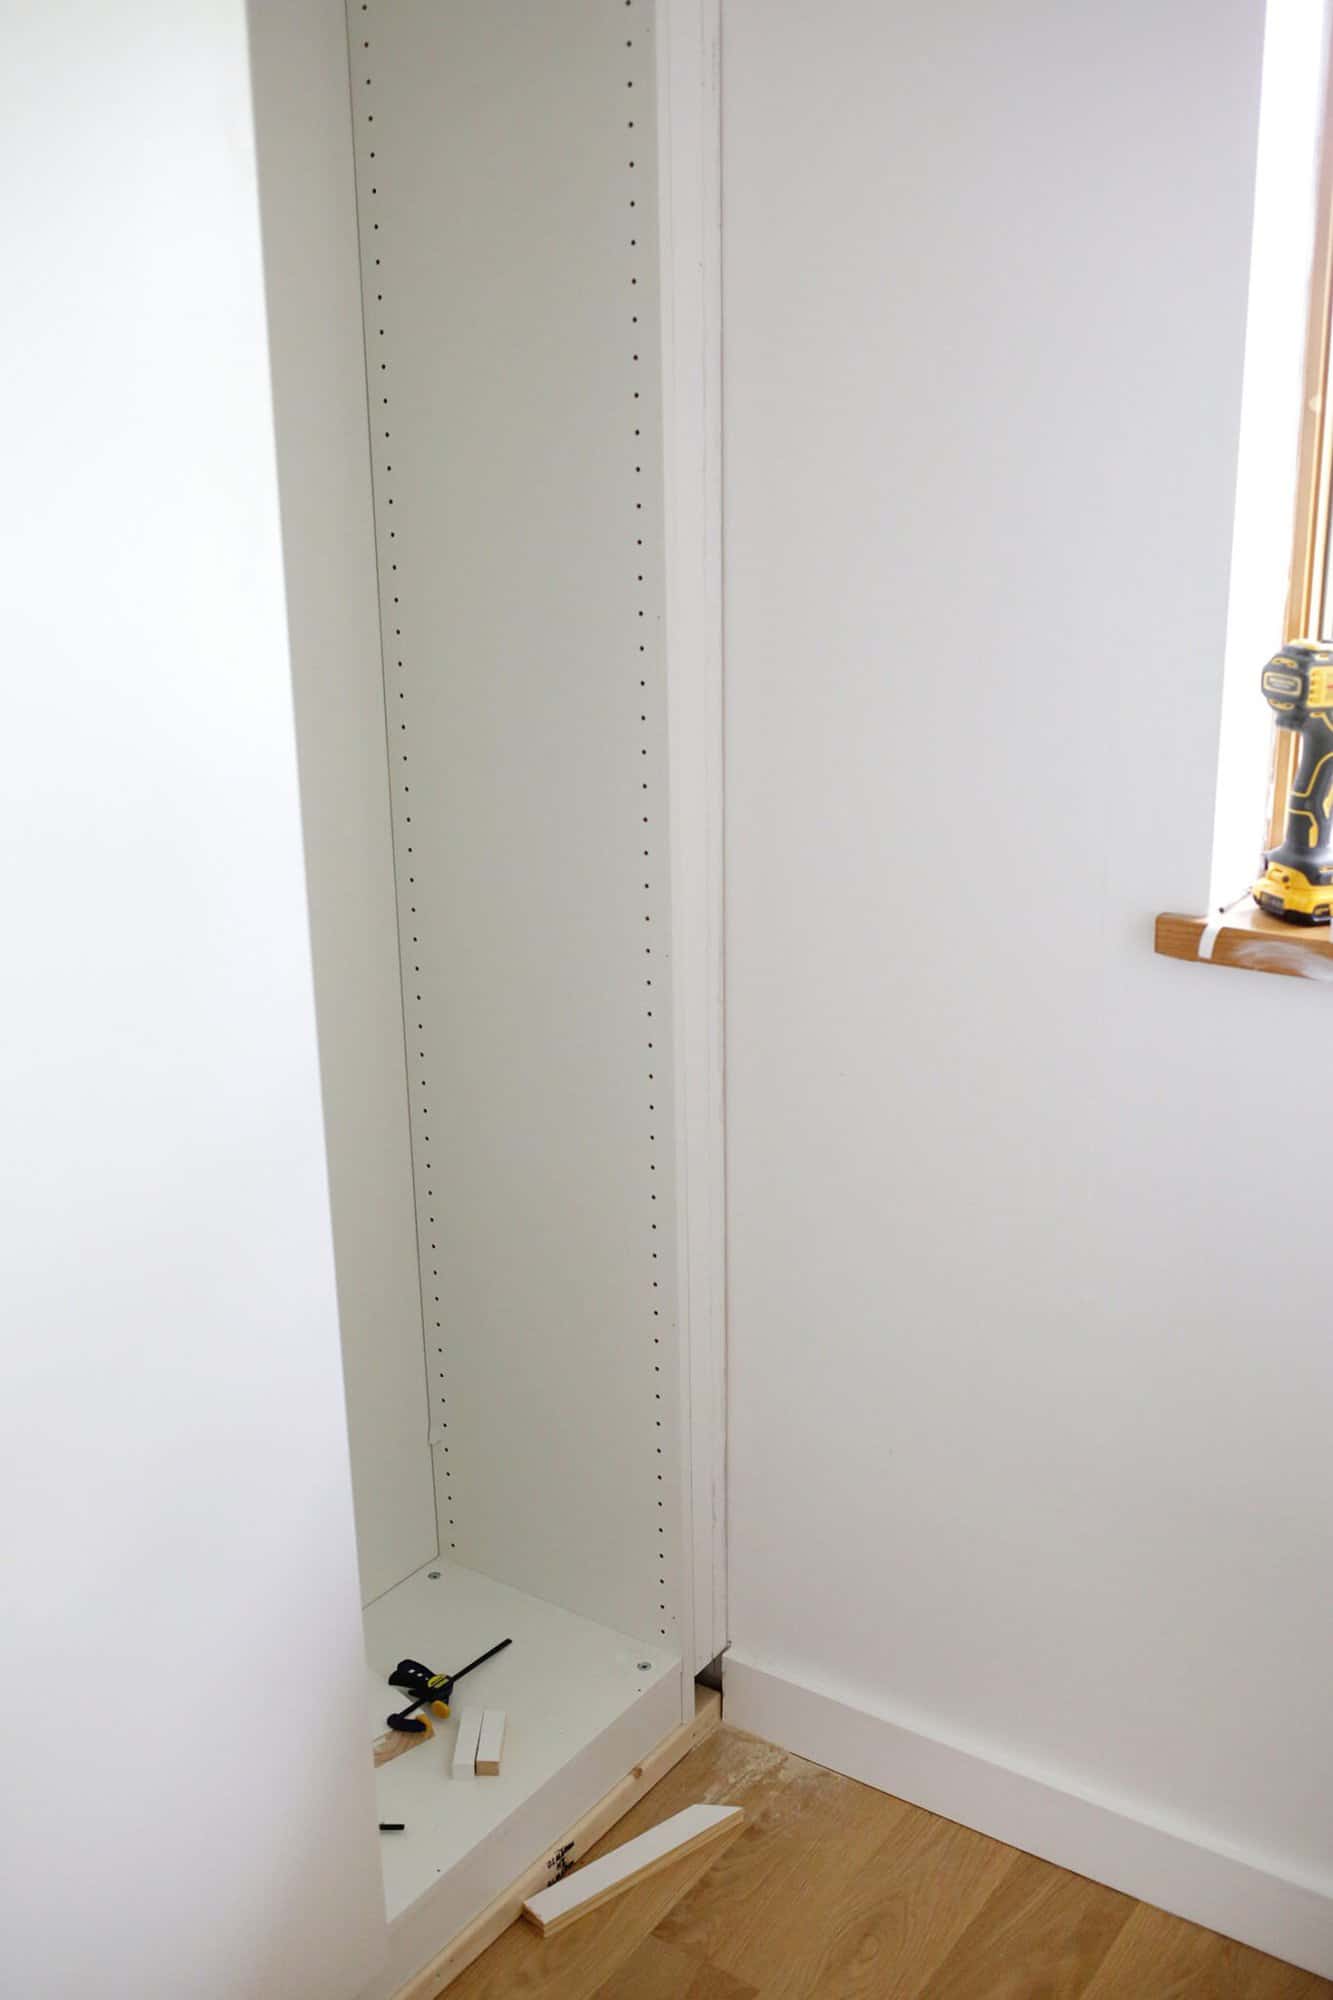
Optional note: As you can see, the right side of my cabinet is right against the wall, so I did add a 3″ spacer trim board to that side to make it easier to open that door without feeling super tight (I’ll show you how).
You won’t need to do that if you are in a free-standing area, but you may consider it if one side is against the wall like mine and you want to move it out a bit.
It is one extra step, and you need to add that into your total width measurements, but it helped a lot since I had a wall and a window in that corner.
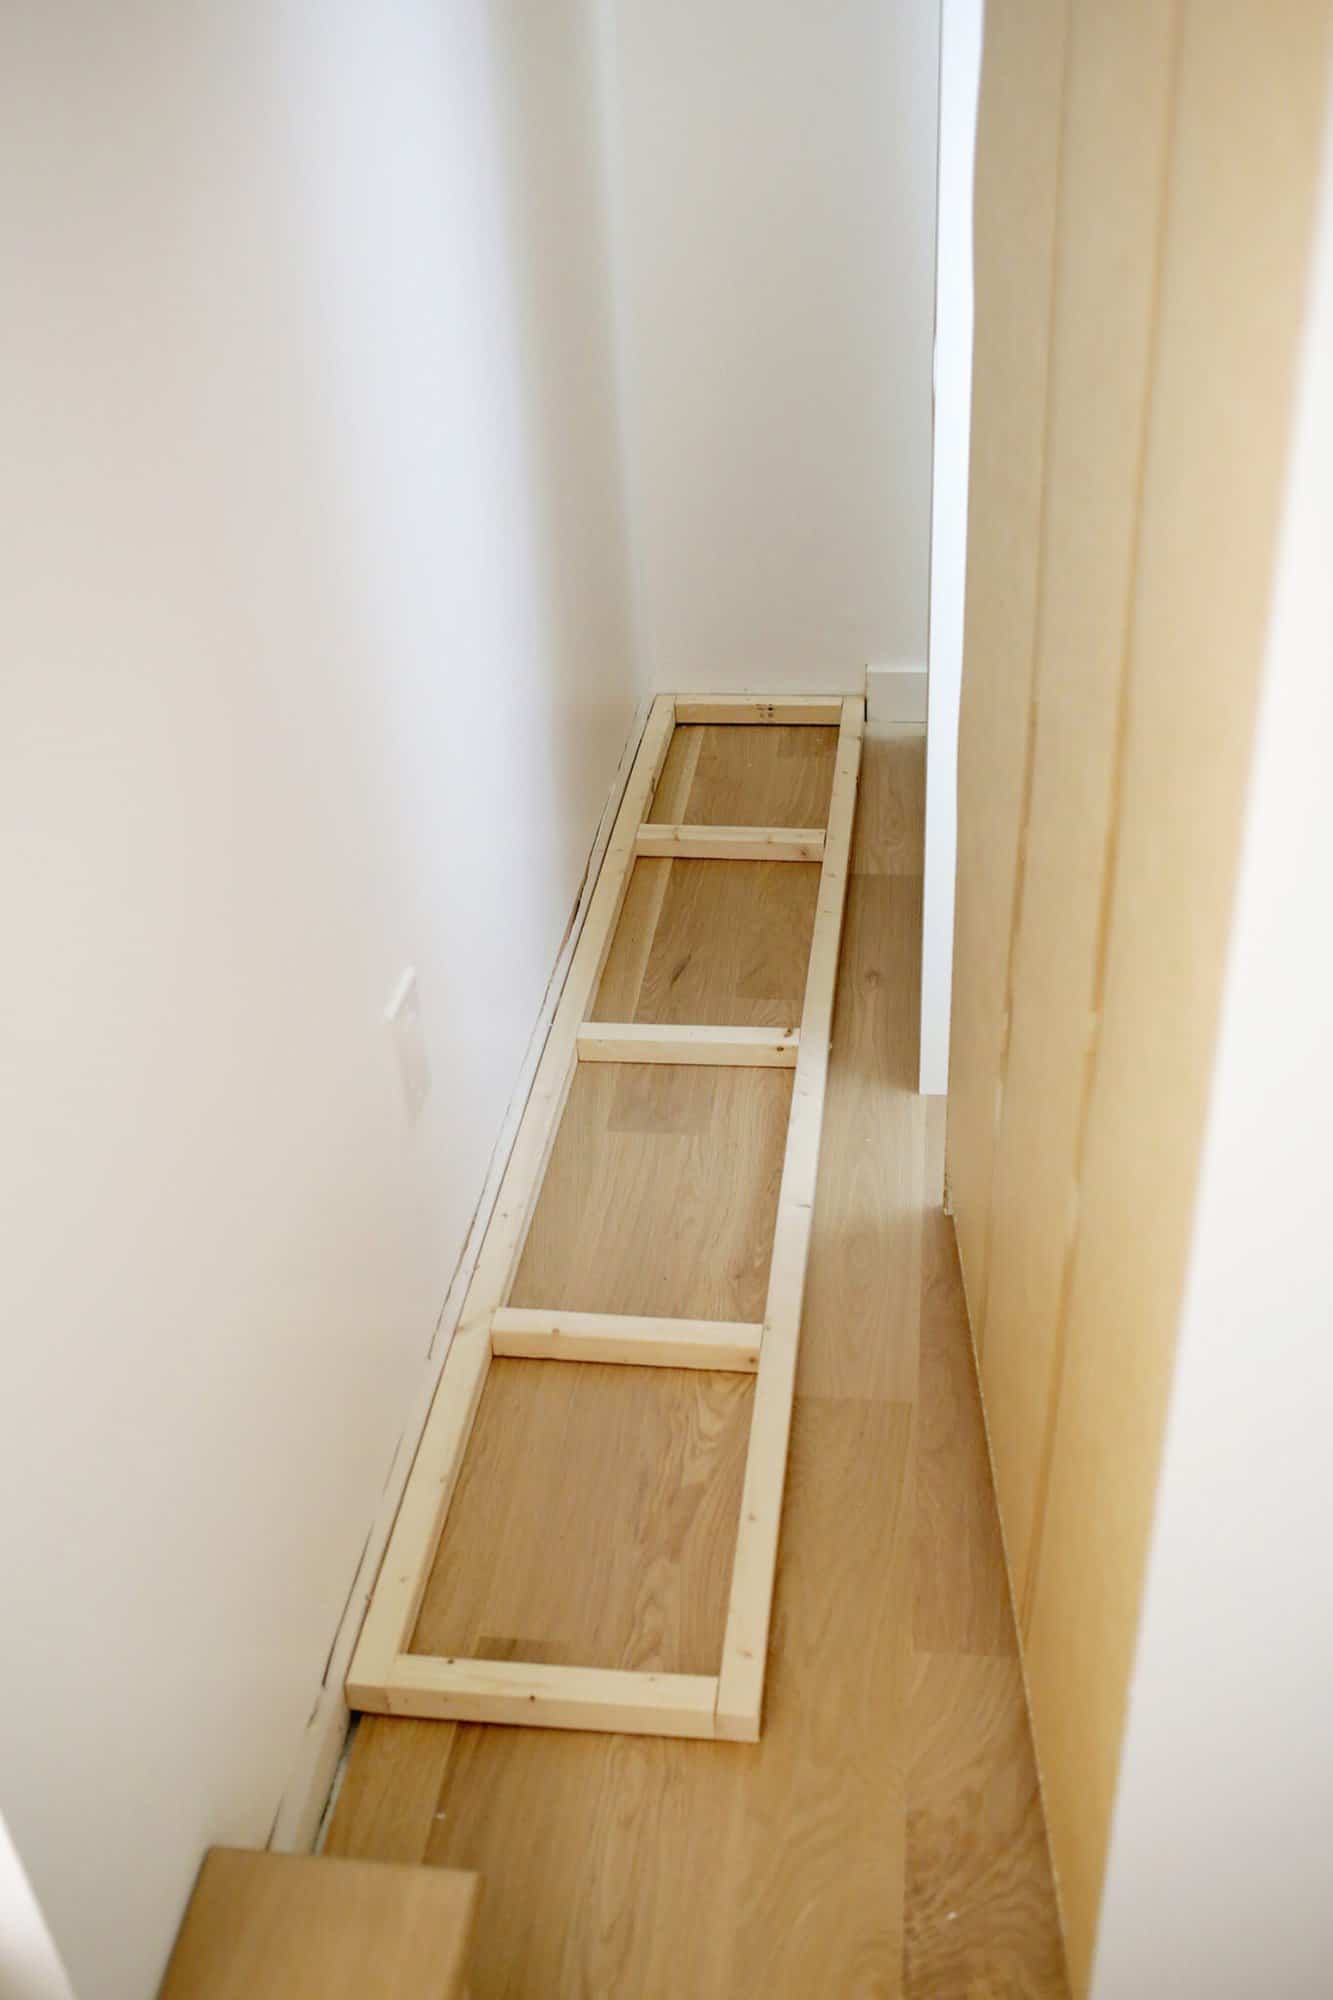
Step three: Attach platform to wall. Use some all-purpose screws to attach the back edge of your base to the wall every 12″ or so. If you had flooring you didn’t care about, you could also drill down into the front edge to secure that to the floor.
But there’s certainly enough weight on the platform once complete to not really need to do that step.
Step four: Add your wardrobes on top (one at a time). Place your closet sections one at a time on the platform, making sure it’s snug against the wall.
The IKEA instructions show you how to connect the sections to each other and then how to connect them to the wall, so just follow their instructions to install.
Step five: Add your trim. Now that your units are sitting on the platform and connected to the wall, you can go ahead and add your baseboard back on. For best results, use a miter saw to cut your baseboard to fit all the way up to and then around your closet (I cut a 45° angle on the corners for a clean look).
Or you can use your hand saw and a miter box if you don’t have a power saw. I cut the wall pieces first to fit and then measured for the pieces around the closet.
Attach with either a finishing nail gun (I have this battery one and I love it) or small finish nails and a hammer and use a nail setter to make sure the head of the nails go in past the face of the wood.
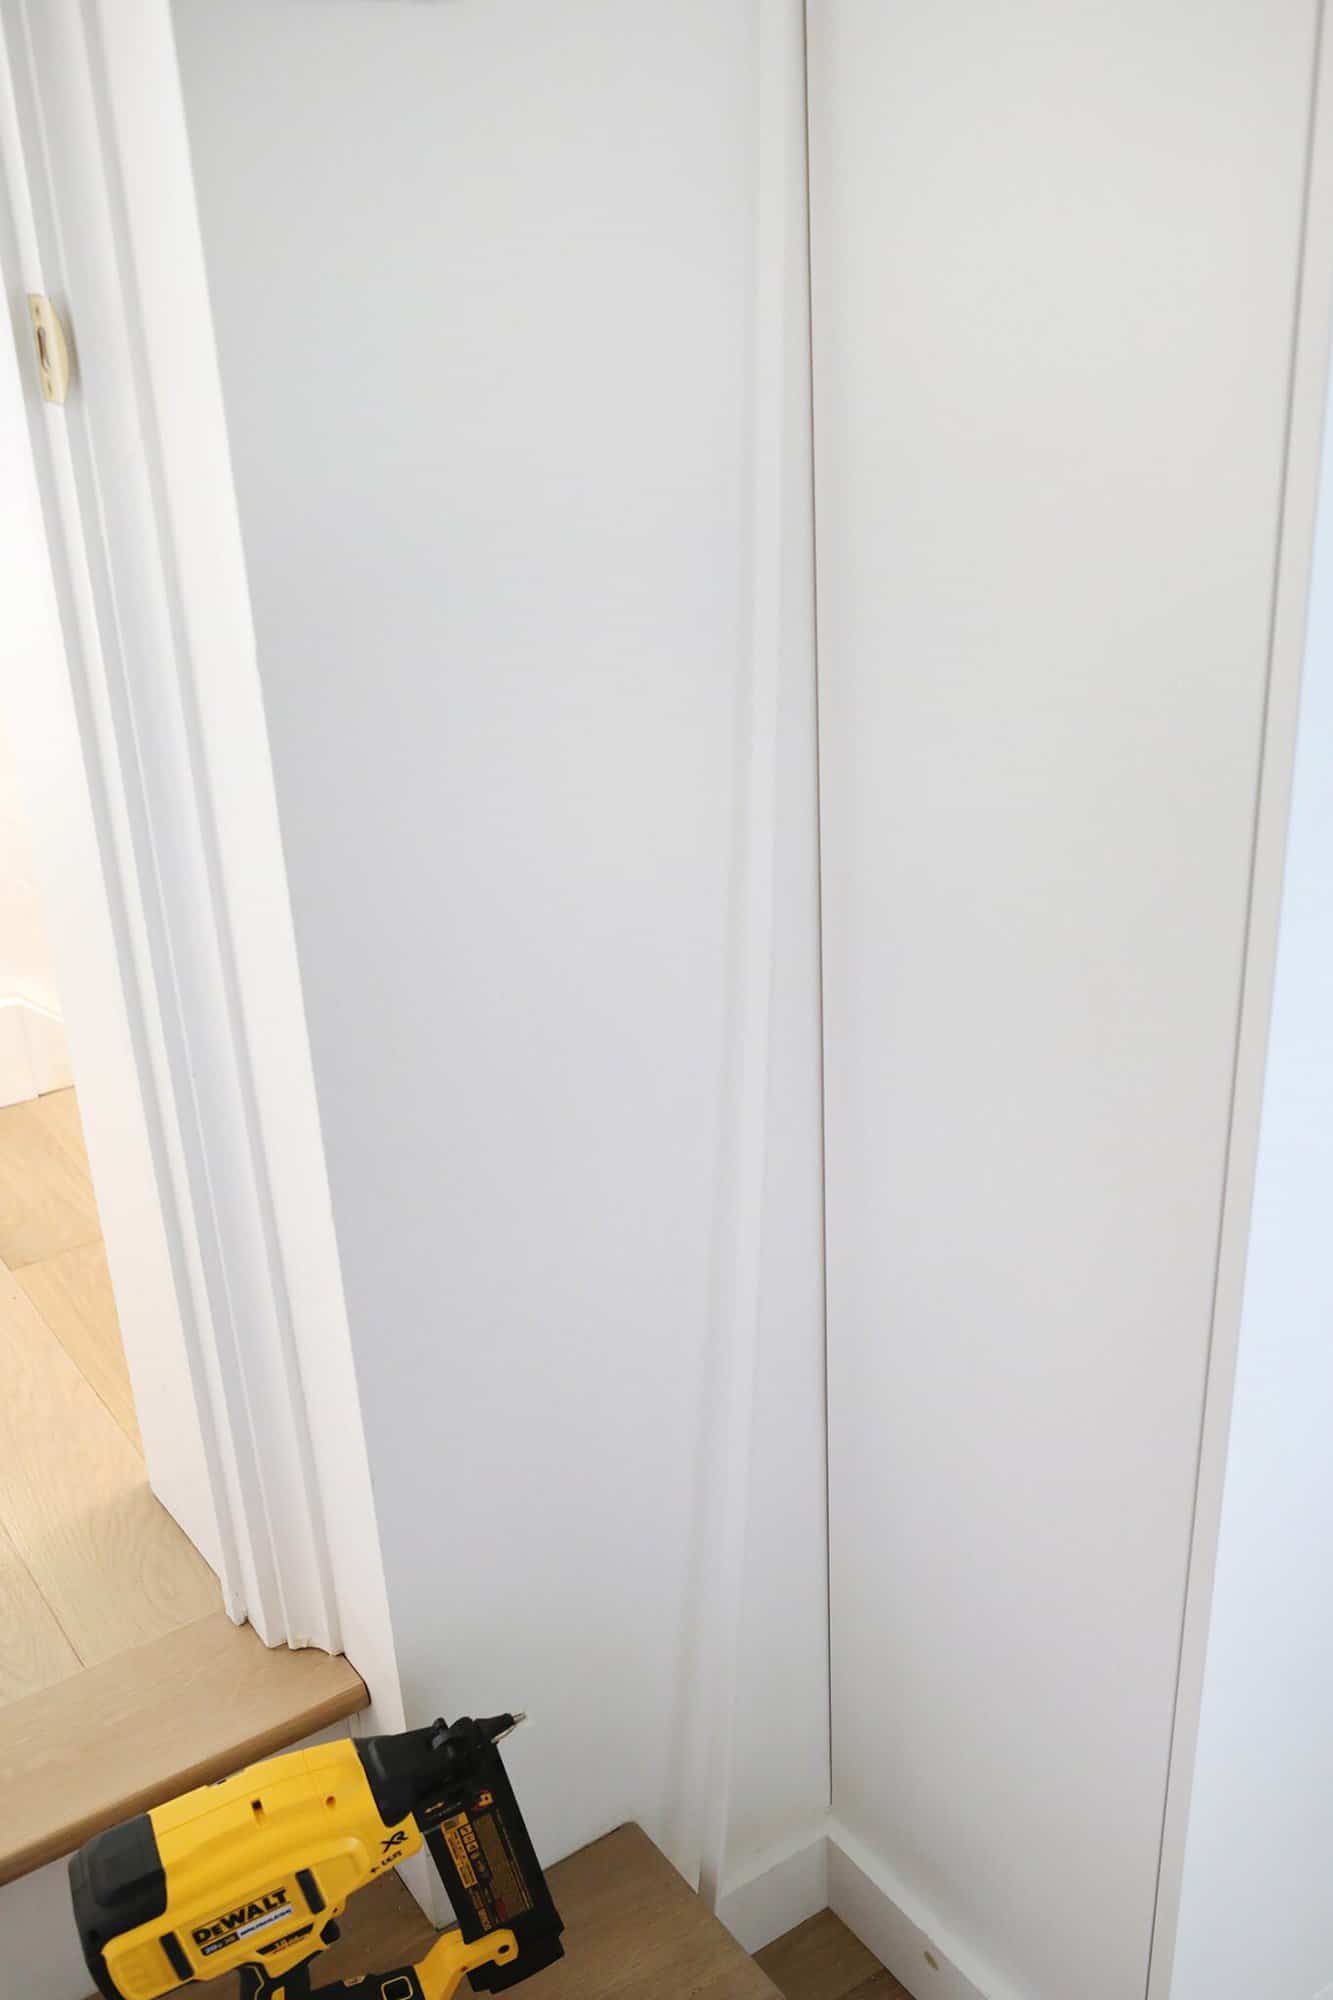
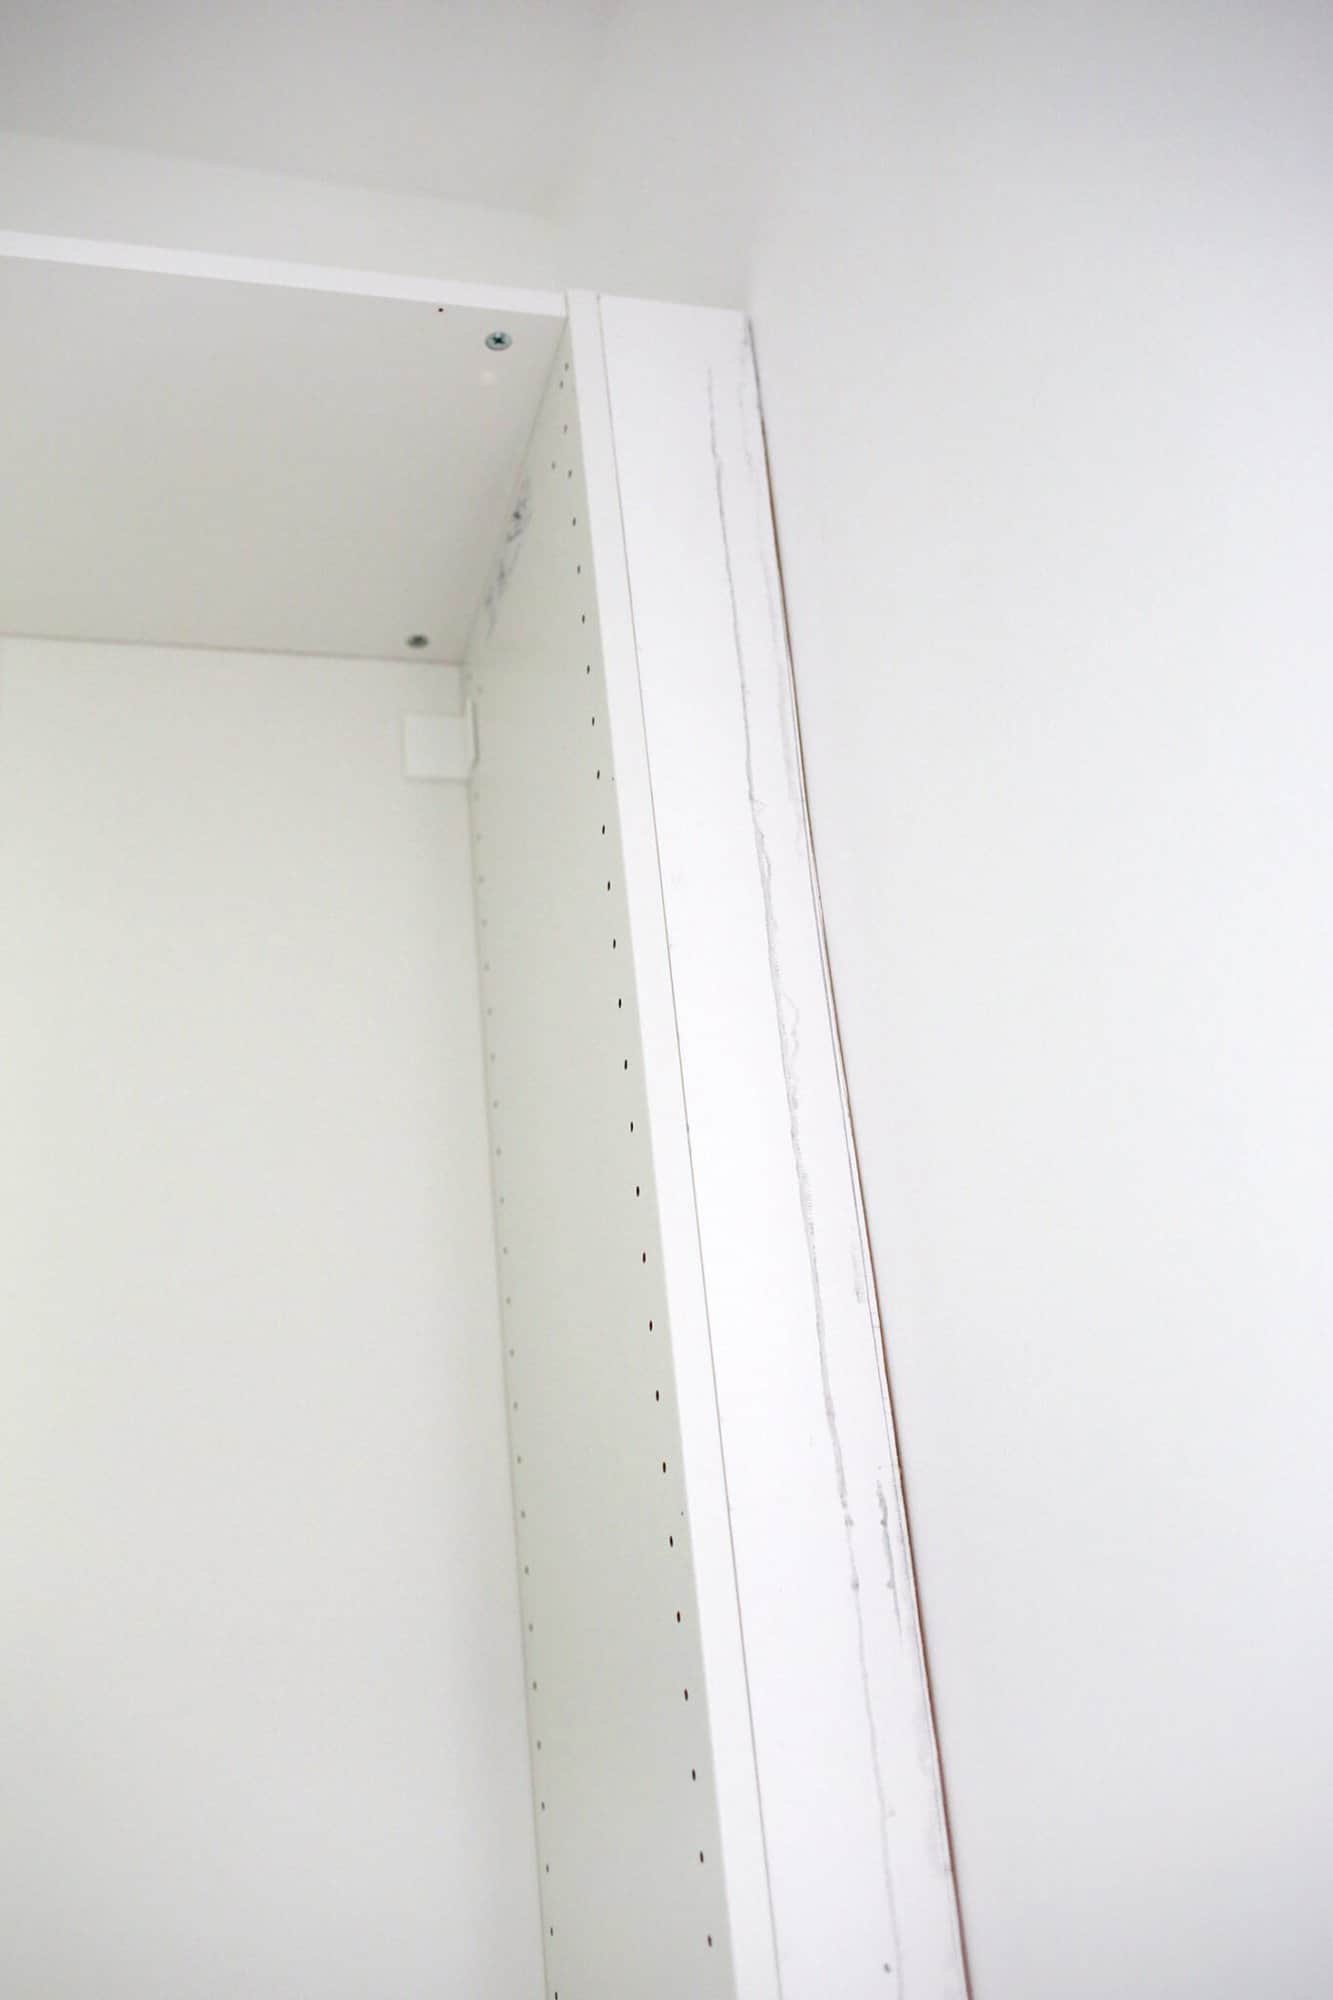
I also added a small piece of cabinet trim to the vertical side gap between the wall and the cabinet (it was actually leftover from my kitchen renovation), but you can order something similar from the cabinet department of a home improvement store.
Or just browse their trim aisle and see if you like anything over there. I just cut it to the height of the cabinet and attached it with a finish nailer.
Step six: Caulk/paint your trim and you’re done! Fill any nail holes with a small amount of wood filler (just wipe with a damp cloth to smooth, easier than sanding) and caulk between the baseboard and the wall or closet to make them look seamless.
When the filler and caulk is dry, paint your baseboards to match either the cabinet or the baseboards in the rest of the room for the ones against the wall only, and your new closet system is ready to use!
I used Melting Icicles by Behr to match IKEA Pax white and it’s a great color match if you are trying to match the stock wardrobe.
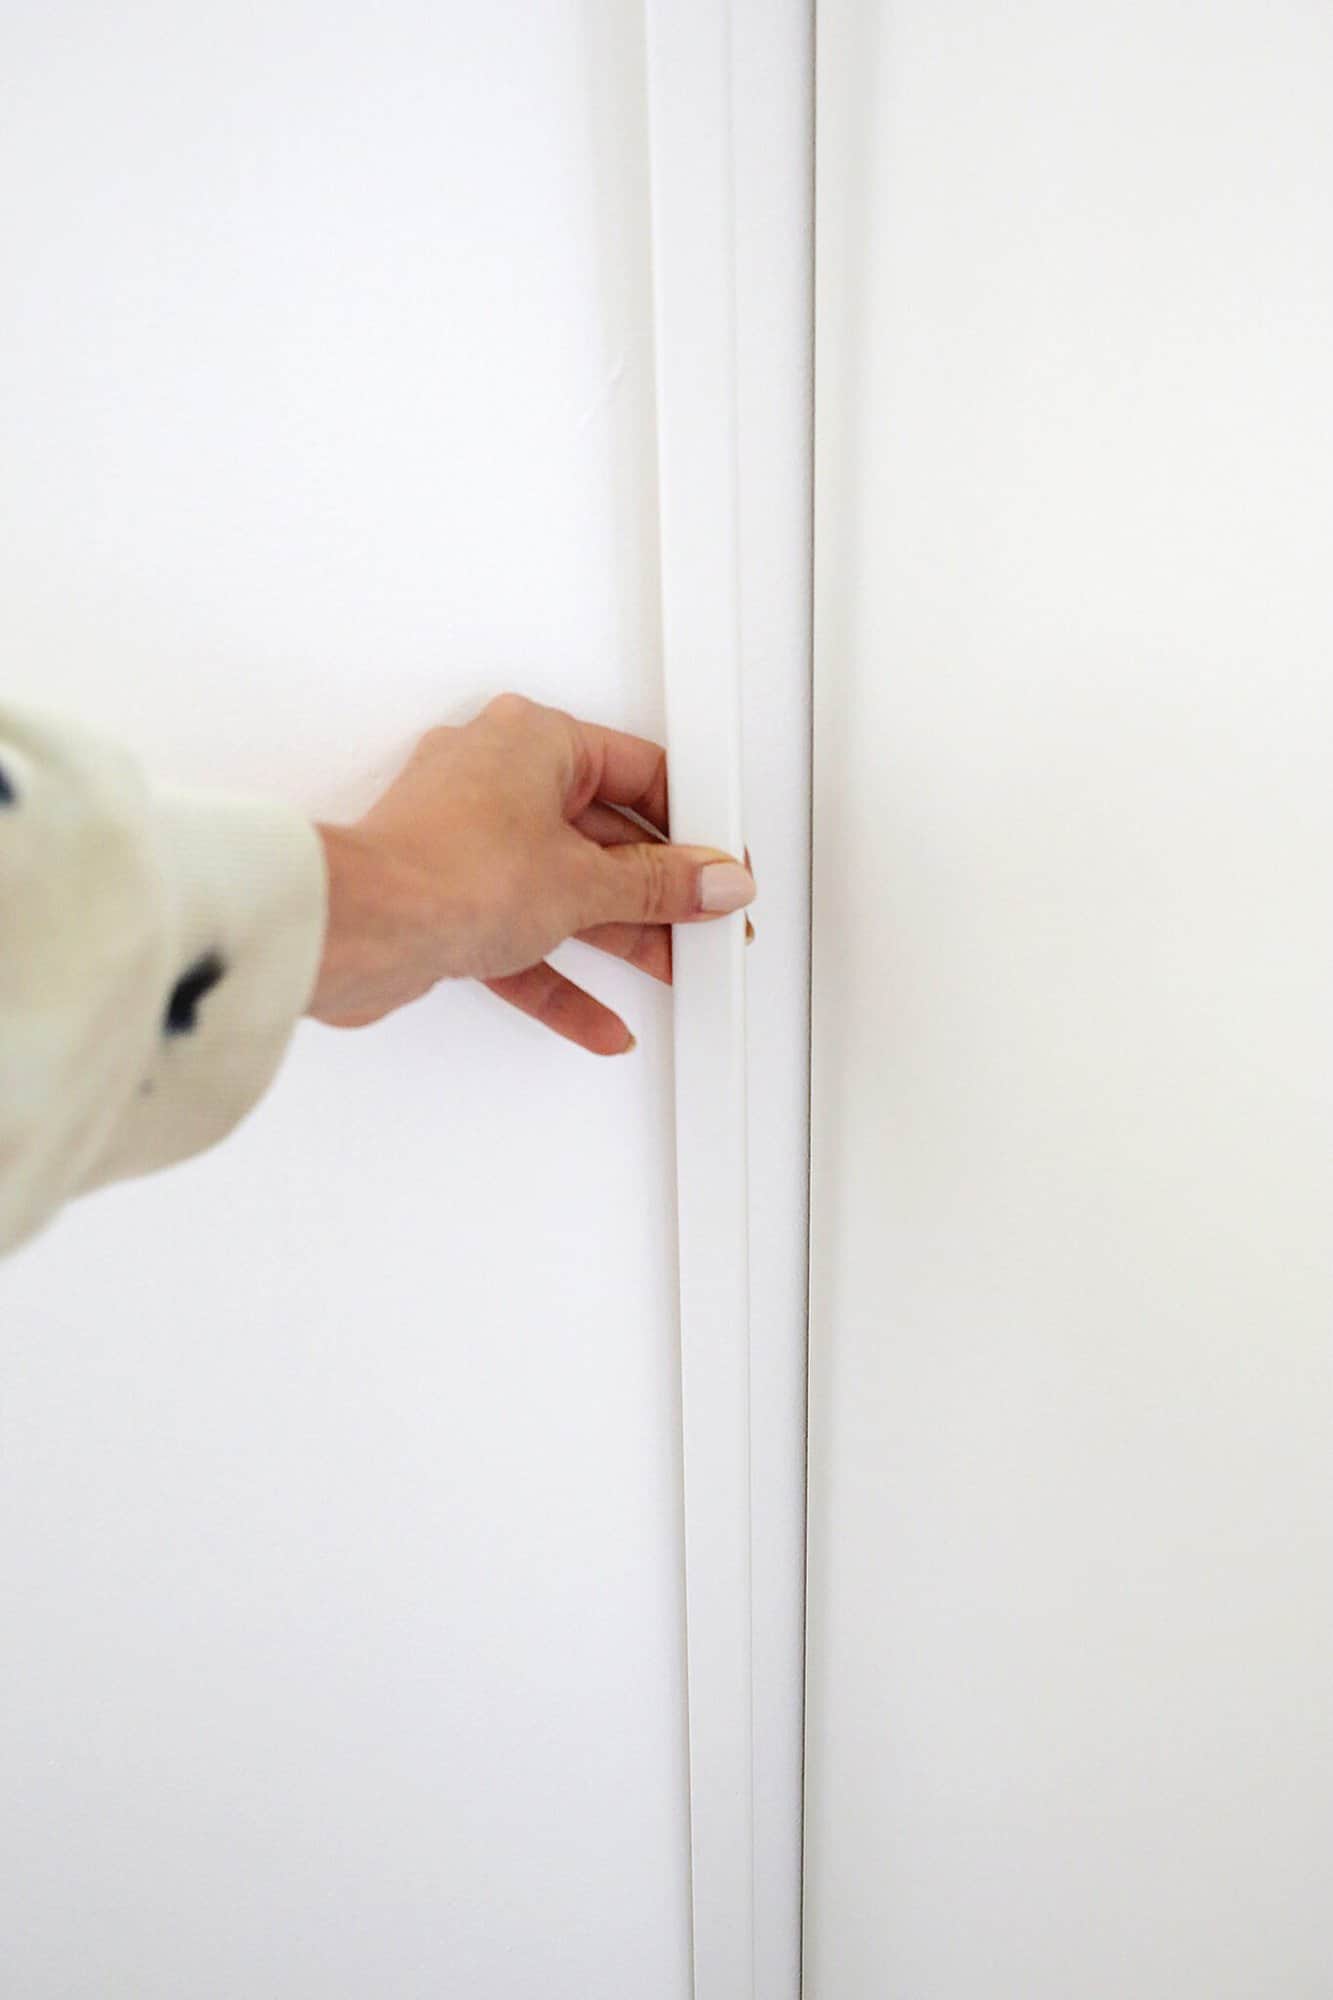
Optional side trim/spacer step: If you do decide to add some length to one side (or both) to get a wardrobe door further from a wall (or to center the whole thing into a recessed area but you have a gap on both sides), add your closets to the platform first.
Once they are attached, scribe the curves of the wall onto a board. Walls are never perfectly straight, or in my case, even a little straight, so you want to trace the actual curve of the wall onto the board.
If you haven’t scribed an uneven wall or floor onto a board, this is a good video that shows you how to scribe in general and this one shows how to do it when filling in a cabinet gap like I did. I cut my board to the right height first and then scribed the curves and used an inexpensive jig saw to cut the lines.
Then, I gently tapped my board into the space with a hammer/mallet (being really careful not to push it back too far so that it lined up flush with the wardrobe front) and attached the spacer to the wardrobe with a finish nailer from inside the wardrobe where it’s barely noticeable at all.
Caulk and paint the spacer and the area will totally disappear into the built-in.

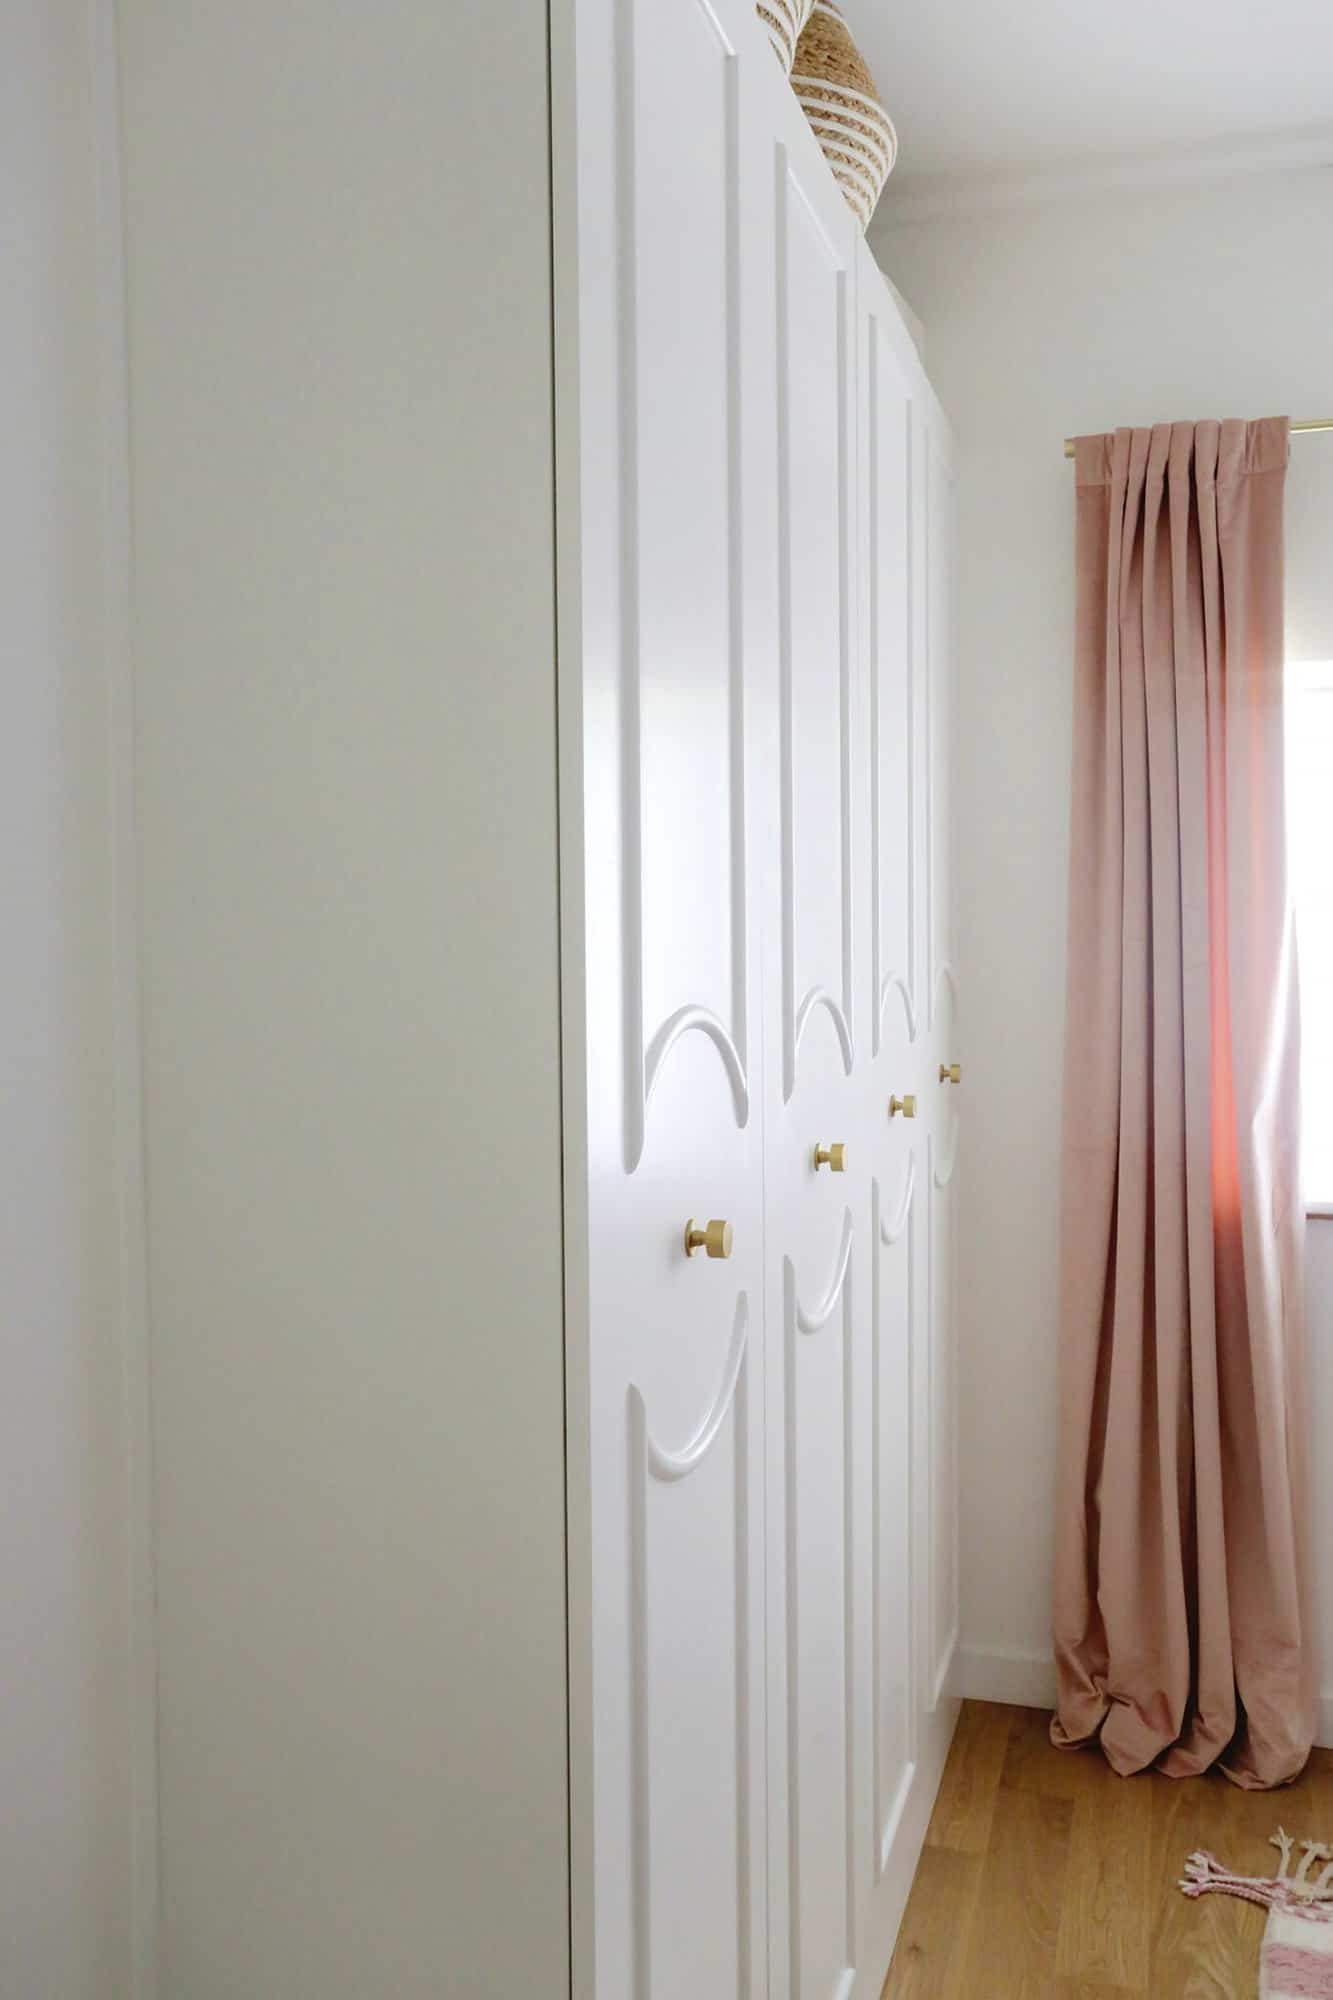
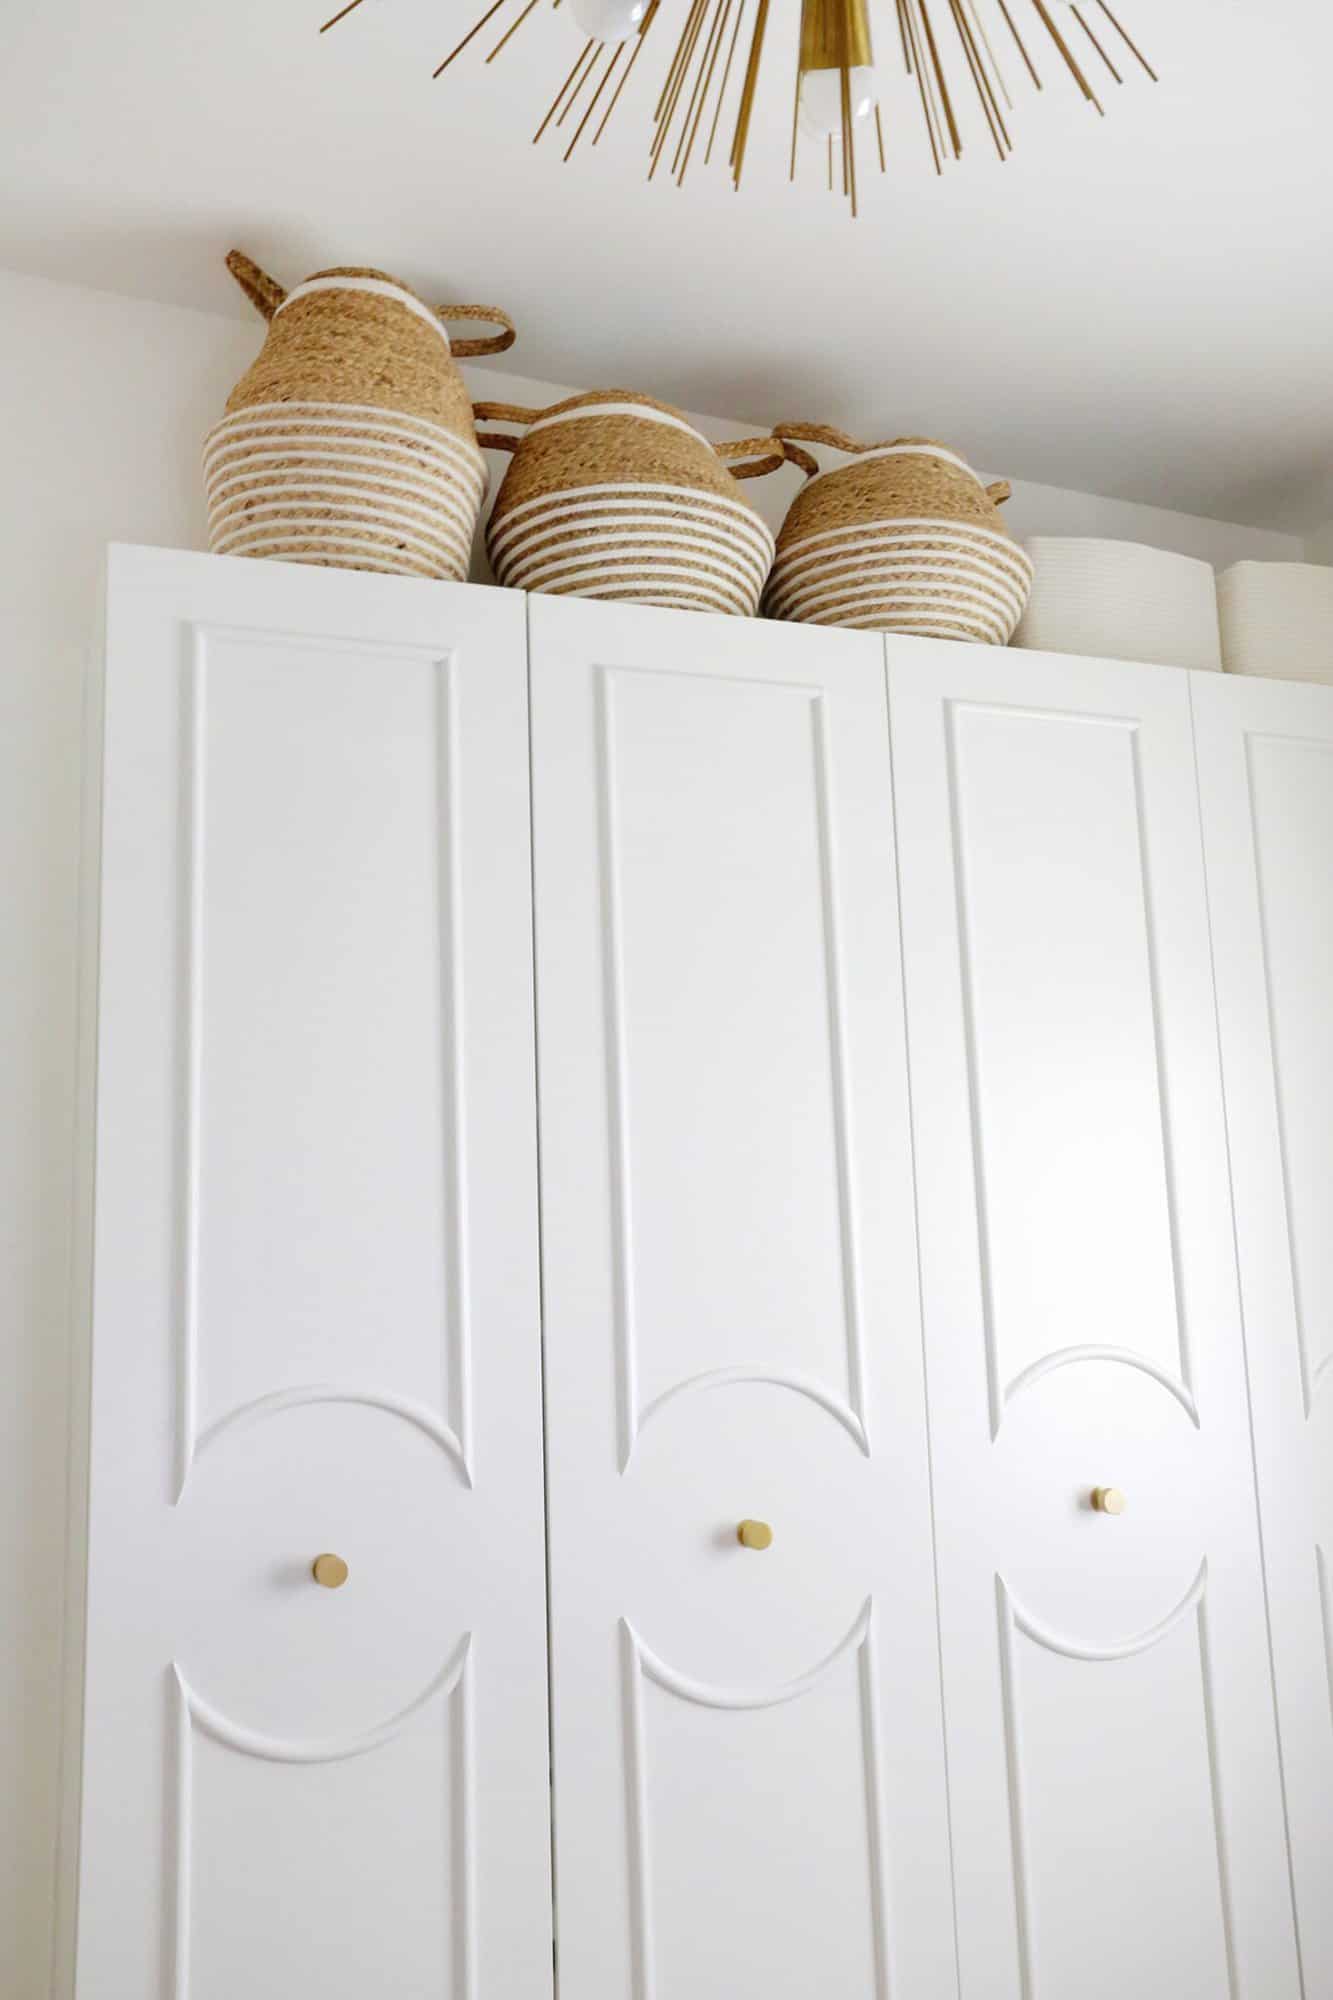
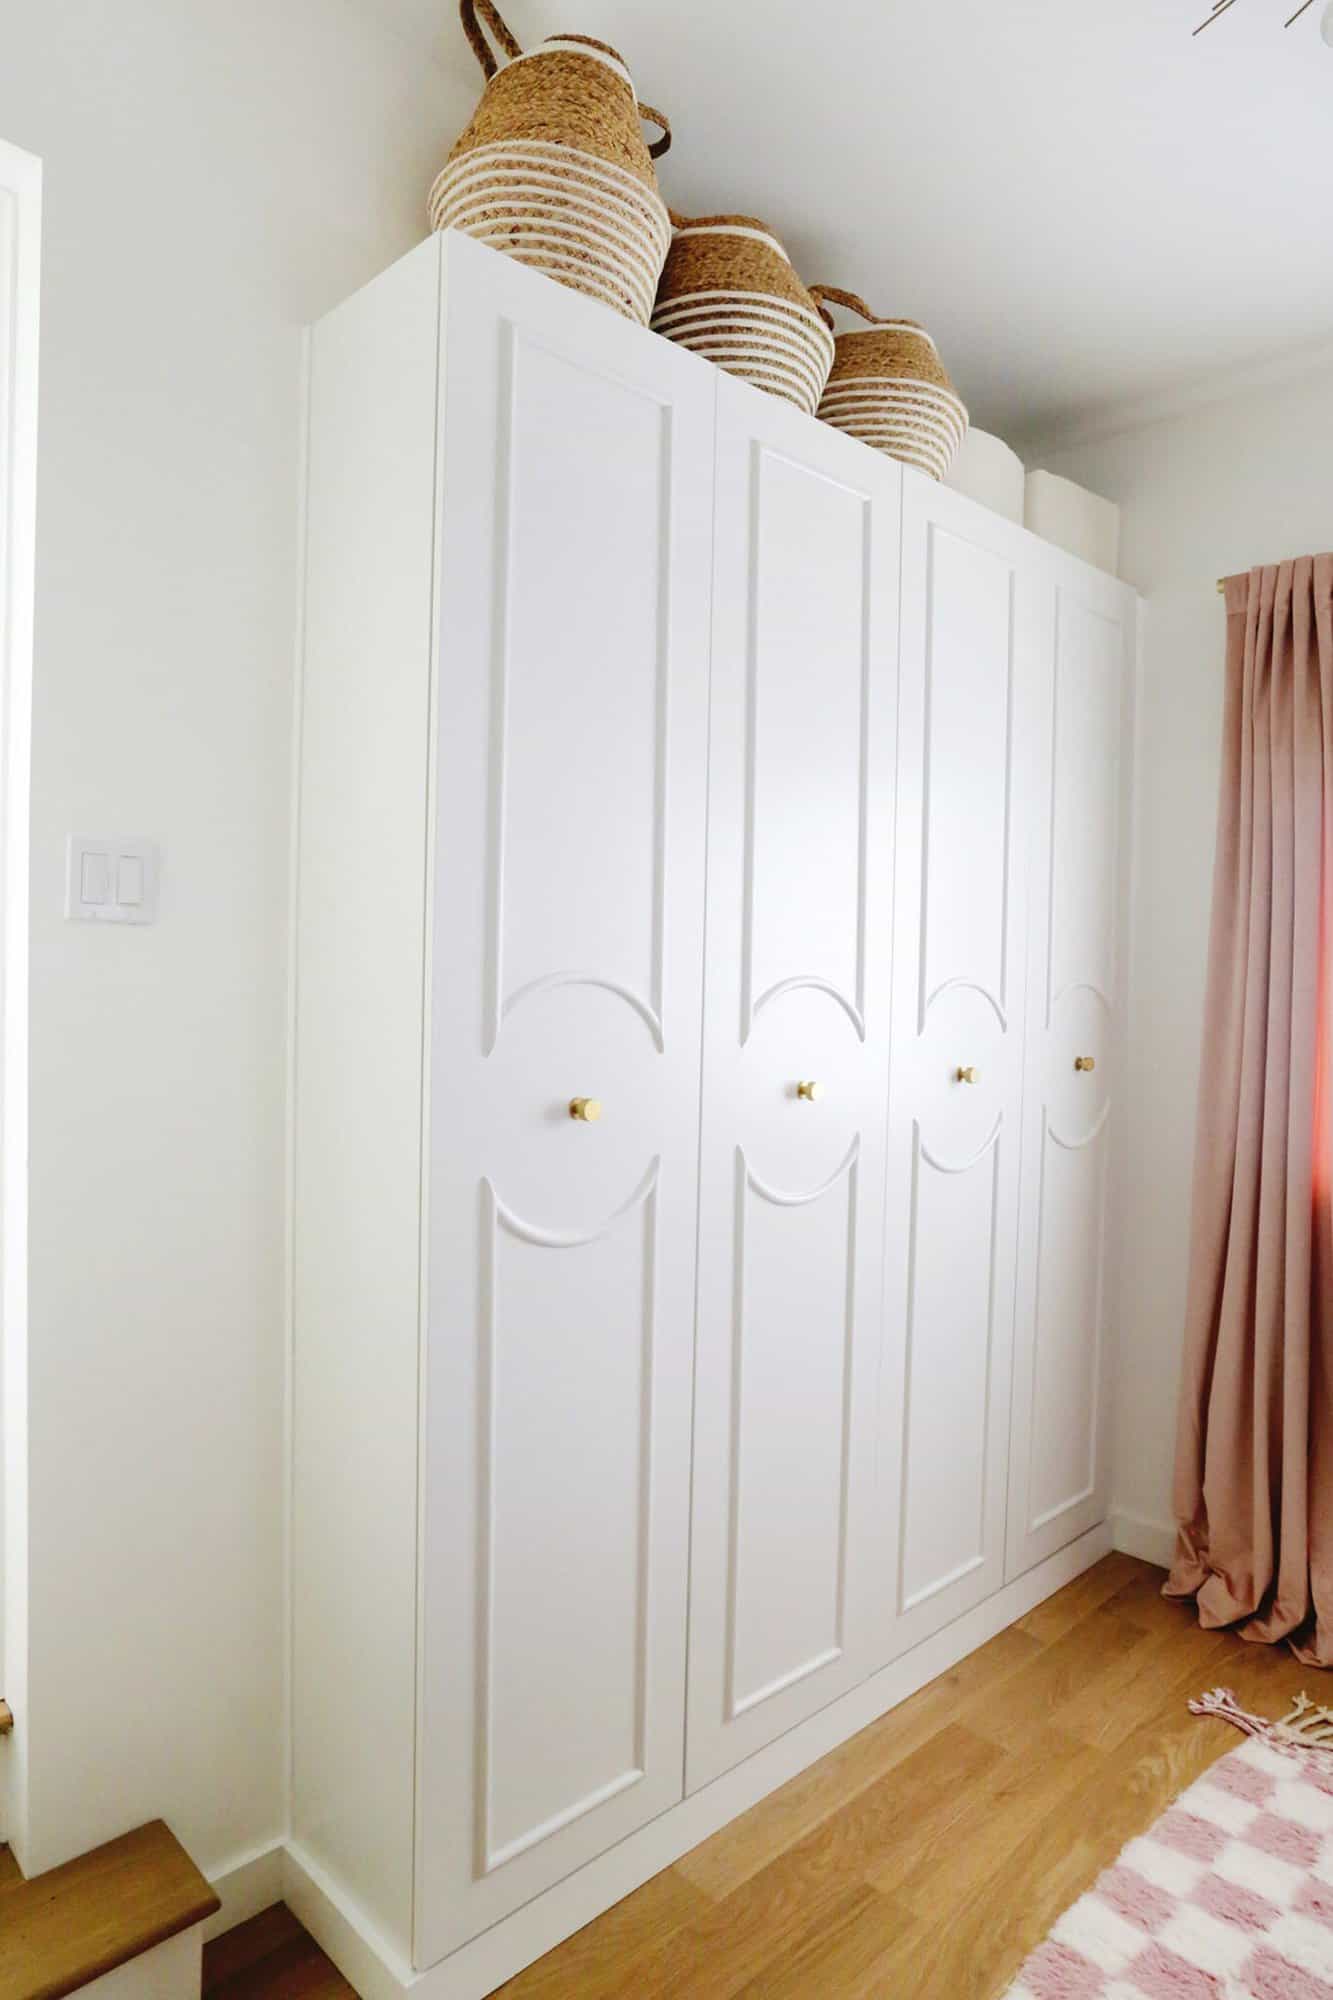
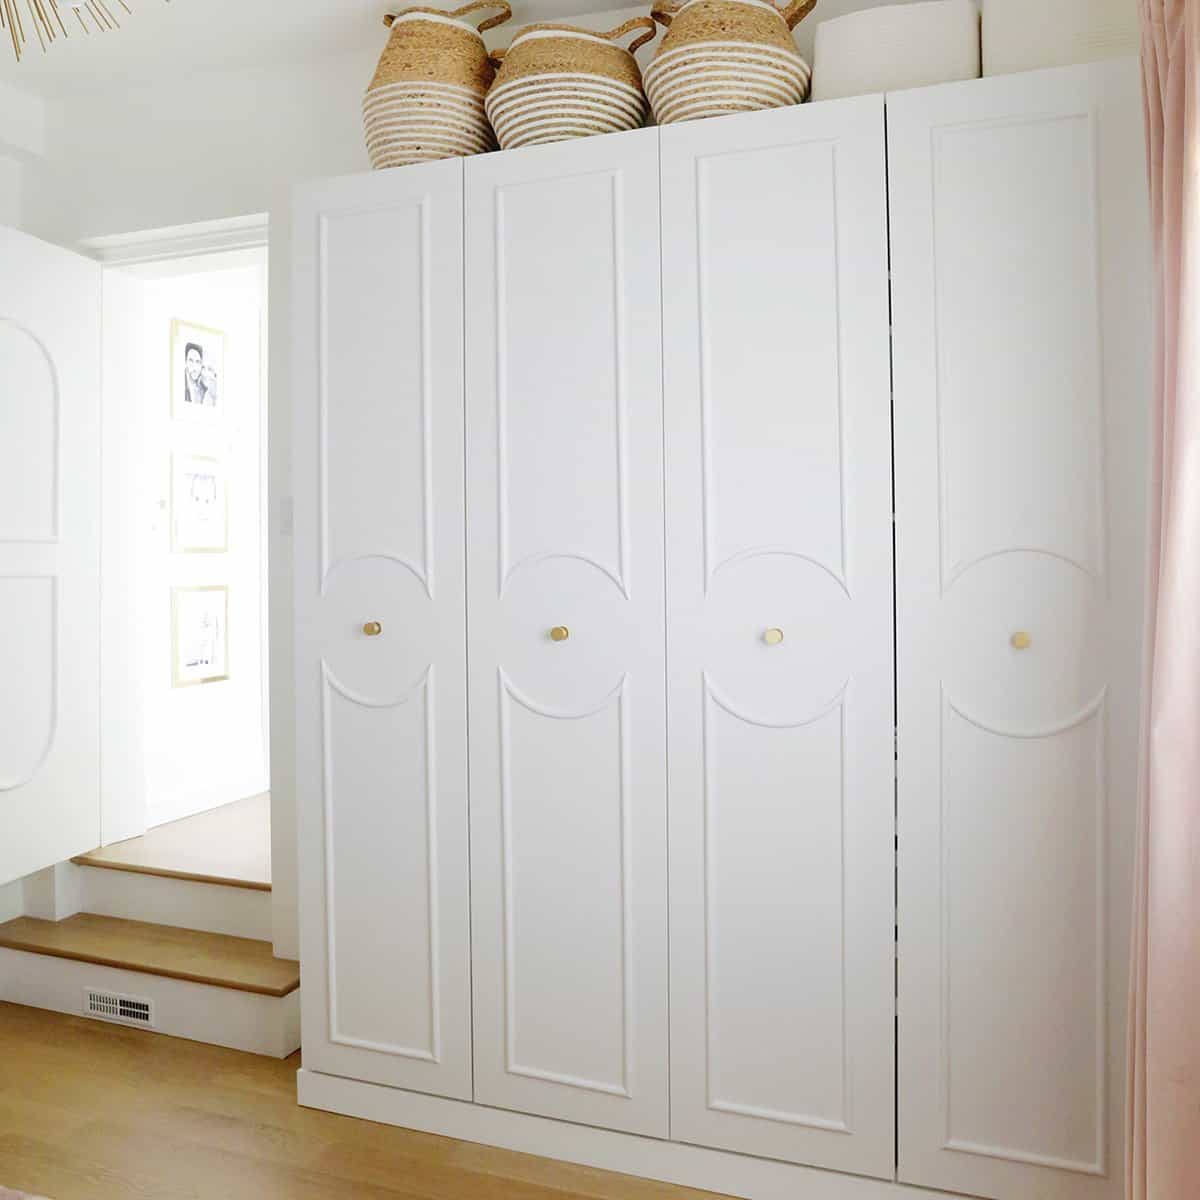
How great does that look?! I did also add some custom trim to the doors to make them feel more Parisian and special.
I’ll show you how to do that in another post, but it’s pretty similar to how I added DIY Arched Door Trim (with Flexible Molding!) to the doors in my house.
If you’ve always wanted some built-in closet or wardrobe storage, this is a great way to do it yourself and you can customize it to the size that you need by buying more or less Pax wardrobe units.
This solved a big problem for me in an affordable way and I love the way that it looks in the room. Hope this helps if you’re thinking of doing the same! xo. Laura
If you want to see more rooms in my home, check out my home tours here!
Easy Hack to Build-In an IKEA Pax Wardrobe
Equipment
- drill
- miter saw or hand saw with a miter box
- finishing nail gun or small finish nails
- hammer
- nail setter
Ingredients
- IKEA Pax wardrobes
- 2 1/2″ or 3″ construction screws
- 2x4s or 2x2s for base
- baseboard to match your current baseboard
- wood filler and caulk
- paint in your current baseboard color and/or IKEA Pax Wardrobe color
Instructions
- Step one: Remove the baseboard. You’ll want to first remove the baseboard on the wall that you are placing your shelving so that it can sit totally flush against the wall. Just use a box cutter/razor to cut the bead of caulk between the top of the baseboard and the wall to disconnect that connection point and use a crowbar to gently pry the baseboard off the wall (pull it a little bit every foot or so to try and keep it all coming off at about the same pace to avoid breaking it).
- If you want to only remove the amount needed rather than the whole baseboard, you can use a multi-tool like this and mark how much board you want removed based on your closet width and length measurements and the cut a line down the board so you can simply pull off the piece you want removed (you can see I did that on the back right corner of my photo).
- Step two: Build your simple rectangle platform. You know what a rectangle looks like? Good. All you have to do now is build a base with either 2x4s or 2x2s that is the same size as your cabinet dimensions. So let’s say for simplicity’s sake your total closet measures 24″ wide and 80″ long, you would build a base 24″ wide and 80″ long so it fits perfectly under your closet. I used a miter saw for this, but you can also use a hand saw with a miter box to cut your boards to the right lengths. You’ll see I also cut some middle support boards that are the same length as my end pieces so the middle of the closet had something to rest on as well. Just screw your boards in place from the outside edges and your platform is ready to go.
- Step three: Attach platform to wall. Use some all-purpose screws to attach the back edge of your base to the wall every 12″ or so. If you had flooring you didn’t care about, you could also drill down into the front edge to secure that to the floor as well, but there’s certainly enough weight on the platform once complete to not really need to do that step.
- Step four: Add your wardrobes on top (one at a time). Place your closet sections one at a time on the platform making sure it’s snug against the wall. The IKEA instructions show you how to connect the sections to each other and then how to connect them to the wall, so just follow their instructions to install.
- Step five: Add your trim. Now that your units are sitting on the platform and connected to the wall, you can go ahead and add your baseboard back on. For best results, use a miter saw to cut your baseboard to fit all the way up to and then around your closet (I cut a 45° angle on the corners for a clean look) or you can use your hand saw and a miter box if you don’t have a power saw. I cut the wall pieces first to fit and then measured for the pieces around the closet. Attach with either a finishing nail gun (I have this battery one and I love it) or small finish nails and a hammer and use a nail-setter to make sure the head of the nails goes in past the face of the wood. I also added a small piece of cabinet trim to the vertical side gap between the wall and the cabinet (it was actually leftover from my kitchen renovation but you can order something similar from the cabinet department of a home improvement store or just browse their trim aisle and see if you like anything over there). I just cut it to the height of the cabinet and attached it with a finish nailer.
- Step six: Caulk/paint your trim and you’re done! Fill any nail holes with a small amount of wood filler (just wipe with a damp cloth to smooth, easier than sanding) and caulk between the baseboard and the wall or closet to make them look seamless. When the filler and caulk is dry, paint your baseboards to match either the cabinet or the baseboards in the rest of the room for the ones against the wall only, and your new closet system is ready to use! I use Melting Icicles by Behr to match IKEA Pax white and it’s a great color match if you are trying to match the stock wardrobe.
- Optional side trim/spacer step: If you do decide to add some length to one side (or both) to get a wardrobe door further from a wall (or to center the whole thing into a recessed area but you have a gap on both sides), add your closets to the platform first and once they are attached, scribe the curves of the wall onto a board. Walls are never perfectly straight, or in my case, even a little straight, so you want to trace the actual curve of the wall onto the board. If you haven’t scribed an uneven wall or floor onto a board, this is a good video that shows you how to scribe in general and this one shows how to do it when filling in a cabinet gap like I did. I cut my board to the right height first and then scribed the curves and used an inexpensive jig saw to cut the lines. Then I gently tapped my board into the space with a hammer/mallet (being really careful not to push it back too far so that it lined up flush with the wardrobe front) and attached the spacer to the wardrobe with a finish nailer from inside the wardrobe where it’s barely noticeable at all. Caulk and paint the spacer and the area will totally disappear into the built-in.